Learn how Arduino pointers work by first learning how Arduino variables work in this easy-to-understand, in-depth guide. Includes examples with example code.
Before we continue on with learning about the I2C protocol and our EEPROM project, we need to discuss variables: what they are and what goes on behind the scenes. Knowledge of how variables work and the use of pointers and indirection with arrays will serve us well when it comes time to read from our EEPROM. Let's begin.
Anatomy of a Variable:
1. What is a variable?
Simply put, variables hold data. More specifically, a variable holds data of a specific data type. For example, an int holds an integer, a string contains a collection of chars, etc.
2. What goes on behind the scenes when a variable is defined and when it is assigned?
When you define a variable, the compiler goes and checks the symbol table (basically a list of variables that have previously been declared) to see if that variable already exists. If it doesn't, the compiler goes ahead and adds the new variable to the list.
Say, for example, you add the following statement:
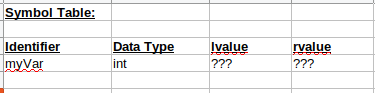
int myVar;Since our variable has not already been declared (it doesn't already exist in the table), the compiler updates the symbol table so it now looks like this:
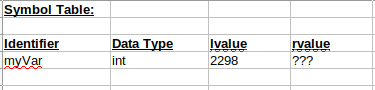
Now, technically, the variable has only been declared at this point- it's missing an actual location in memory. To get this location in memory, the compiler requests a place to put this variable from the system's memory manager. The memory manager then responds with a memory address which the compiler then adds to the symbol table for that variable. This memory address is known as an lvalue (lvalue = location value) and it merely represents where the variable can be found in memory. With this addition of the lvalue to the symbol table, our variable is now defined:
With our new variable defined, we can now move on to storing a value in it. Fortunately, assigning a value to a variable is rather straightforward. When we assign a value to a variable, we directly navigate to the variable's location in memory (the lvalue) and update the memory at that address with the new value. The data that's actually stored in memory is known as the rvalue (rvalue = register value).
Continuing our example with the following assignment statement:
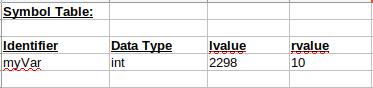
myVar = 10;With this assignment, our symbol table now looks like this:
Another way to visualize what we have just gone over is with an lvalue-rvalue diagram:
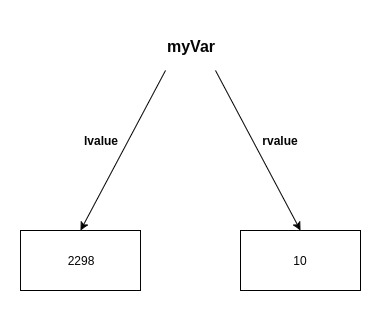
This diagram is why you will see some people refer to the memory address as the "left value" and the actual data value as the "right value".
- There's also an important caveat here: in Arduino, and C in general, there is no duty to clear that rvalue at our variable's lvalue when we define it. Therefore you should always assume that a variable's value contains whatever garbage was originally in that memory location unless we've explicitly assigned a value to the variable. (i.e., Don't assume it's 0 or null). Therefore it's probably best to go ahead and initialize your variable with a value when you define it.
Let's summarize: Whenever your program needs to use the value stored in a variable, it uses the variable's lvalue to go to that memory address and retrieves the data (rvalue) from that memory location.
Pointers:
Now that we've covered what variables are and how they really work, we're ready to understand pointers. Simply put, a pointer is nothing more than a variable that references the memory address of another variable. Using the terminology that we've just learned, a pointer is a variable whose rvalue is the lvalue of another variable.
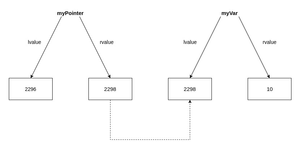
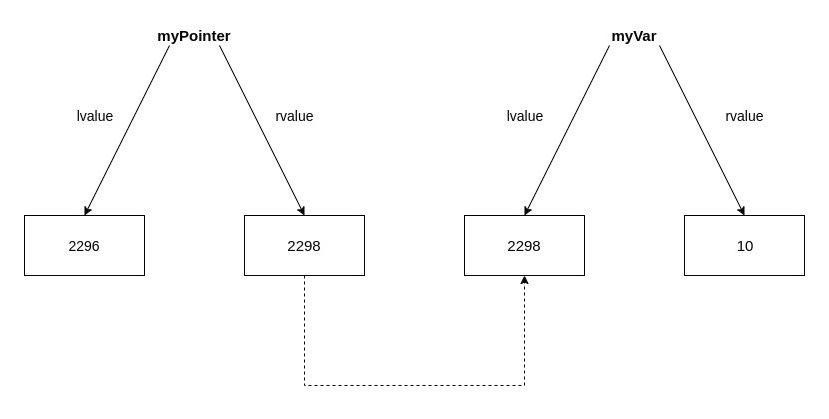
To visualize this, let's take a look at two lvalue-rvalue diagrams representing the value type variable myVar and the reference type variable myPointer:
Declaring a Pointer:
Declaring a pointer variable is rather straightforward:
int *myPointer;The type specifier (int in this case) must match the data type of the variable the pointer is to be used with. The asterisk indicates to the compiler that myPointer is a pointer. Since whitespace doesn't really matter in C, the asterisk can be placed anywhere between the type specifier and the pointer variable name so you will sometimes also see: int* myPointer, int * myPointer, etc.
The Address-Of Operator:
By itself, a pointer that is defined but does not actually point to anything is a pretty pointless pointer (ha!). To point it to the memory address of another variable we simply need to assign the pointer the memory address of that variable. But where do we get the memory address from? That is, where do we get the lvalue of myVar from? Enter the address-of operator (&).
The address-of operator is a unary operator that returns the lvalue of a variable.
Pointer Assignment:
To point our new pointer at the memory location of our value type variable, myVar, we simply call the following statement:
myPointer = &myVar;This completes the link shown in the previous diagram and is known as referencing. It is for this same reason that the address-of operator (&) is also known as the "referencing operator".
Whenever you are learning a new concept, it's a good idea to try it out yourself to prove to yourself what you've read. Let's mock up an example of what we've learned so far in the Arduino IDE:
void setup() {
  Serial.begin(9600);

  int myVar = 10;  // Initialize a variable.

  Serial.print("myVar's lvalue: ");
  Serial.println((long) &myVar, DEC);  // Grab myVar's lvalue
  Serial.print("myVar's rvalue: ");
  Serial.println(myVar, DEC);
  Serial.println();

  int *myPointer;   // Declare your pointer.
  myPointer = &myVar; //Assign myVar's memory address to pointer.

  Serial.print("myPointer's lvalue: ");
  Serial.println((long) &myPointer, DEC);  //myPointer's lvalue
  Serial.print("myPointer's rvalue: ");
  Serial.println((long) myPointer, DEC);  //myPointer's rvalue
}

void loop() {
}
Watching the serial monitor, what you should see is something like this:
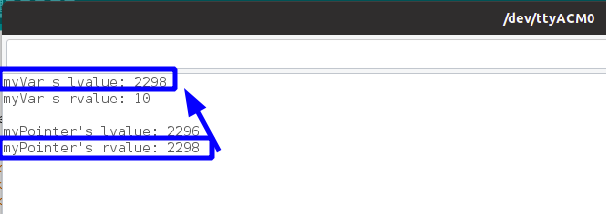
Notice that myPointer's rvalue is the memory address of myVar (i.e. myVar's lvalue), just like it shows in the diagram.
Indirection (Dereferencing):
We just saw that a pointer can reference a location in memory by assigning that pointer a variable's memory address using the reference operator (&). We can take this a step further and obtain the actual value stored at that memory address by dereferencing the pointer. This is also known as indirection and is accomplished via the indirection operator (*) with your pointer. Example:
*myPointer = 5; // Go to memory addressed stored in myPointer's rvalue (myVar's lvalue) and place the value 5 in that memory address.Continuing off our previous Arduino code example:
void setup() {
  Serial.begin(9600);

  int myVar = 10;

  Serial.print("myVar's lvalue: ");
  Serial.println((long) &myVar, DEC);
  Serial.print("myVar's rvalue: ");
  Serial.println(myVar, DEC);
  Serial.println();

  int *myPointer;
  myPointer = &myVar;

  Serial.print("myPointer's lvalue: ");
  Serial.println((long) &myPointer, DEC);
  Serial.print("myPointer's rvalue: ");
  Serial.println((long) myPointer, DEC);
  Serial.println();

  *myPointer = 5;  //THIS IS OUR DEREFRENCING ADDITION.
  Serial.println("-----------------------");
  Serial.println("Updating *myPointer = 5");
  Serial.println();

  Serial.print("myPointer's lvalue: ");
  Serial.println((long) &myPointer, DEC);
  Serial.print("myPointer's rvalue: ");
  Serial.println((long) myPointer, DEC);
  Serial.println();

  Serial.print("myVar's lvalue: ");
  Serial.println((long) &myVar, DEC);
  Serial.print("myVar's rvalue: ");
  Serial.println(myVar, DEC);
  Serial.println();

}

void loop() {
}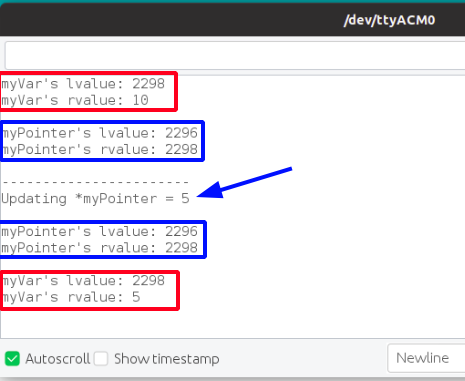
Notice that nothing changed to myPointer at all (blue). Neither its lvalue nor its rvalue changed. Contrast that with myVar (red) which had it's rvalue changed to 5 by the indirection operator we applied to our pointer.
That is the power of pointers and indirection. In the next journal entry, we will discuss pointers and arrays which will then allow us to finally move on to the last part of our EEPROM I2C project!
Changelog
Update (1/22/20): Added reference to the next tutorial in the series: Pointers, Arrays, and Functions in Arduino C.