An in-depth introduction to how Arduino arrays and Arduino functions work in C; including an introduction to function pass by value and pass by reference.
Now that we’ve completed our introduction to pointers, I had really wanted to move on and wrap up our section on using an EEPROM with the I2C protocol today. However, I feel like I would be doing a disservice to you without elaborating further on why we would even want to use pointers in the first place.
Just to recap, let’s look at some simple code to demo the syntax of using a pointer:
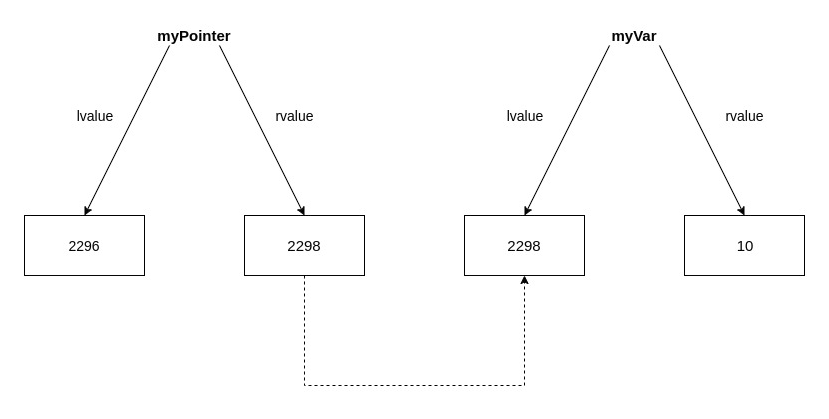
int myVar = 10;
int *myPointer;
myPointer = &myVar;
*myPointer = 20;
If you were to compile this code and run it, you would see that at the end myVar’s value would now be 20 even though you’ll notice we never set myVar itself to 20. We accomplished this by referencing our pointer, myPointer, to the memory address of myVar using the reference operator (&). We then dereferenced our pointer by using the dereference operator (*) with our pointer and setting its value to 20.
And if you haven't read the previous lesson, I highly recommend you do so, the concepts introduced there will serve you well throughout your programming life (not to mention the rest of this article):
Now, the obvious question you probably have is, “Why in the heck would I want to do that?”
The example above is more of a toy, obviously contrived, but there are very real reasons why you would want to do this, especially when you’re running a microcontroller like the Arduino and you have to handle a lot more low-level operations. To see the value in pointers, you’ll first need to know something about how functions work in C.
I want to keep this explanation of functions at a high-level to keep the concepts easy to understand. For now, just know there are two ways to call a function: by value and by reference.
Function Call By Value:
We’ll start with the easiest one- easiest because it’s the one you’re most familiar with; you’ll see that a function call by reference isn’t particular difficult either.
int sum(int x, int y) {
int sumZ = x + y;
return sumZ;
}
void main {
int a = 2;
int b = 3;
int sumAB = sum(a,b);
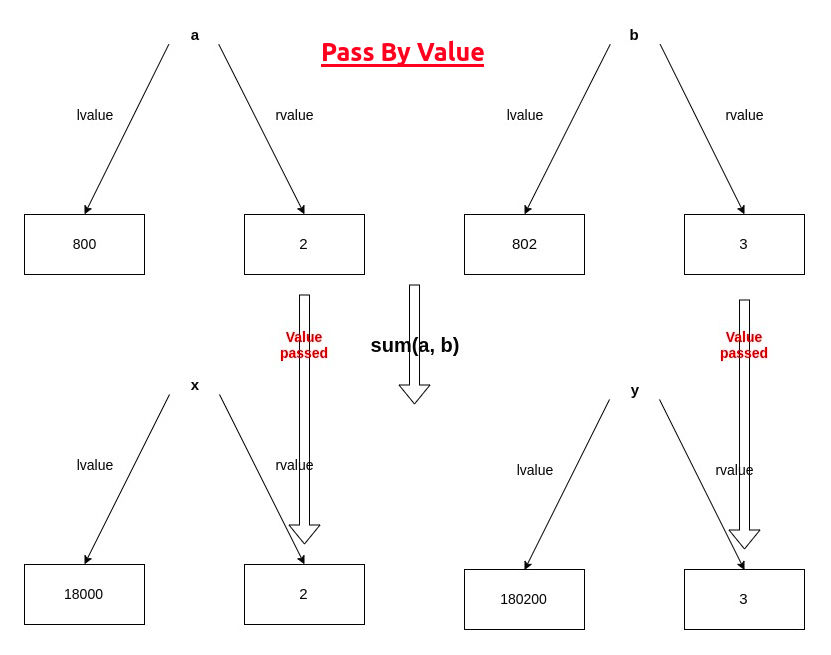
}Start by reading this kind of code like a computer would: with the main function. We set a = 2 and b =3, we then go to get sumAB by calling the function sum(a,b). When we call that function, we replace a with the value of a (i.e. 2) and b with the value of b (i.e. 3), so we could just as easily say int sumAB = sum(2, 3);
In the sum function we created, we set x = 2 and y = 3 inside the function due to the above arguments that have been passed to it. This is called passing by value because we’ve merely passed the values of the variables. Inside the function those values passed to it (the values of a and b in this case) are copied to its variables (x and y in our example).
You’ll see this can actually be a problem if we wanted the function to actually do something with those original variables (like change them). The function that has had its arguments passed by value can’t actually change the values of the arguments themselves because all it has access to is the function’s own copy of those values (i.e. x and y have a different lvalue from a and b even though their rvalues are the same).
So yeah, it can change the values of x and y, but it doesn’t affect the values of a and b because they reside at a different location in memory. Additionally, the values of x and y cease to exist as soon as we exit the stack (i.e. right after we return sumZ).
Thankfully, there’s a way around this: enter call by reference.
Function Call by Reference:
So what if we want to actually change the parameters that we are passing to a function? Or what if we simply want to return more than one value? How can we escape the box that is the function’s call stack? That’s where call by reference (pointers) comes to the rescue.
void addOne (int *numA) {
*numA = *numA + 1;
}
void main() {
int varA = 15;
addOne(&varA);
Serial.println(varA);
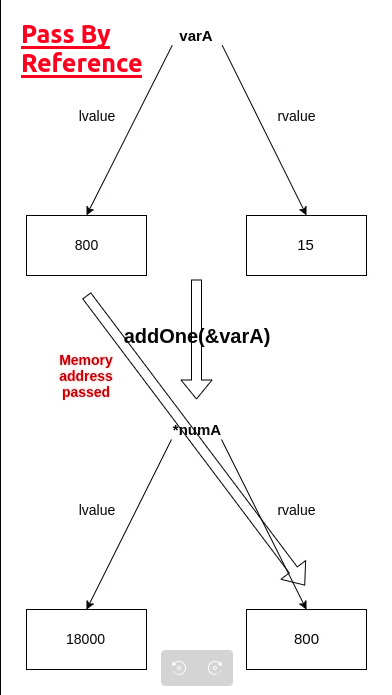
}Let’s again think about what’s happening here. We are taking a variable, varA, and extracting its memory address (its lvalue) with the reference operator, &. We are then passing that memory address in for the parameter numA in the function addOne. You can think of this as being the equivalent of declaring and initializing the pointer: int *numA = &varA. Inside the function, we are given direct access to the value stored in varA by dereferencing our numA pointer. The result of this program is the console prints 16 now stored in varA.
In a much more general (and I dare say enlightened sense), another way you can think of this is that in a way, this really is the same as call by value where we simply pass the rvalue of our parameter off to the function’s internal variables. The key difference is that for a pointer, its rvalue is simply the memory address of what it points to, therefore a memory address is what gets copied to the function!
Advanced Topic: This is the perfect opportunity to introduce this. In programming, particularly the C family of languages, there are two distinct categories of variables: value type variables and reference type variables. Now that you’re an expert on function call by value, function call by reference, and pointers, you can appreciate where the terms come from. Value type variables are variables where the rvalue stores an actual value (like an int storing the value 10). Value type variables tend to be associated with the “primitives”- primitive variables like int, char, byte, etc. Reference type variables store a memory address in their rvalue.
Arrays:
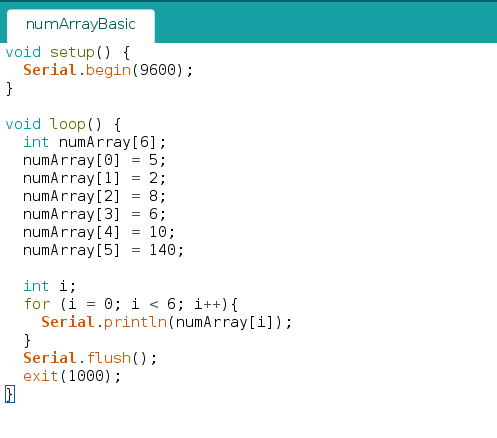
You’re undoubtedly familiar with the usual way of looping over an array, where we simply increment the index:
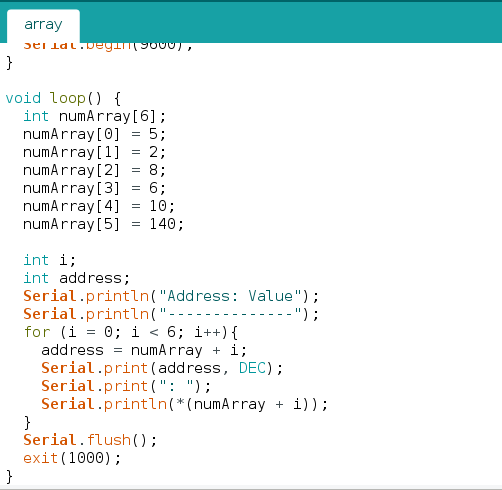
But what if I told you, there was another way? Take a look at the following code:
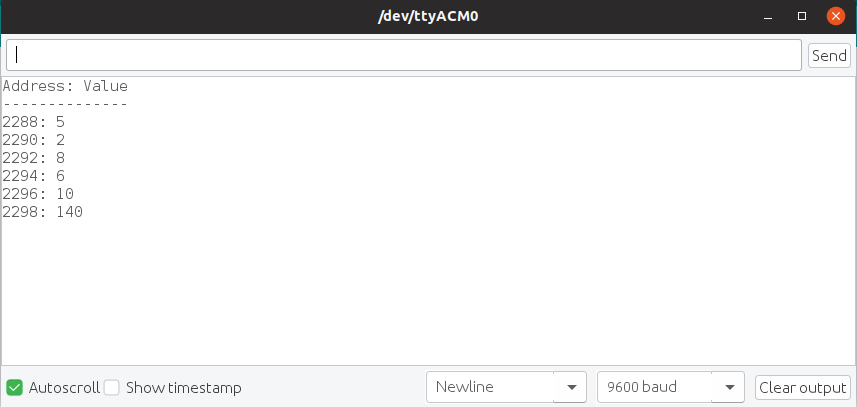
They have the exact same output!
But why?! How?!
Look closely at the line where we print our value: Serial.println(*(numArray + i)); That looks like a pointer doesn’t it? Well, that’s because it is. Let’s dissect this a little more and look inside the parentheses. We know I is an int so as this loop progresses we’re adding + 0, +1, +2, etc. What does that tell us about numArray then? Well, that means it has to be a number of some sort for the addition operation to make any sense. But what kind of number? Well, we know this is a pointer so it must be what? That’s right, numArray is an address!
Now that you understand how pointers work, you now understand the implications of what this means. It means that when you define an array, what you’re actually doing is defining a pointer. The name of an array itself, such as numArray, is actually a memory address! If you read that advanced topic blurb above, the implication is that arrays are actually reference type variables and are therefore inherently passed by reference when used in functions.
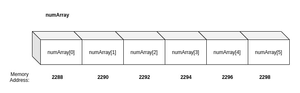
Before we close this page of the notebook, I want to highlight a “gotcha”. Let’s say numArray had a memory address of 2288 as it apparently does from my screenshot above. If I = 1, why is it on the second iteration of the loop the address is 2290 and not 2289? The reason is because of how the compiler handles pointers. You see, when you define the array initially, the compiler is smart enough to allocate the memory based on the size of the data type used. In our case, we used ints which, in Arduino C, are two bytes long. When you iterate a pointer, the compiler is smart enough to multiply the iteration by the size of the data type for the next memory address. Therefore we start at 2288 and the next memory address for our next item in the array is 2290, followed by 2292, 2294, and so on:

Changelog
Update (1/22/20): Added additional reference to the previous lesson in this series, discussing Arduino variables behind-the-scenes, as well as pointers.