
Ensure the security and stability of your network with our guide on backing up your Pihole configuration. Discover the importance of Pihole backups and step-by-step instructions on how to backup and restore your Pihole settings using both web GUI and command line methods.
What is Pi-hole and Why You Need to Make Pi-hole Backups
For many of us, Pihole is not just a simple adblocker; it's a full-fledged DNS server responsible for not just internet domain name resolution but also local DNS resolution to internal, self-hosted resources. As a central network resource, Pihole may even be your DHCP server, assigning IP addresses to devices as they join the network. As such, a Pihole downtime could represent a significant network outage. A simple Pihole backup can get you quickly back online without having to reverse engineer your network figuring out what local DNS mappings and what MAC addresses you had assigned to what IP addresses in your Pihole configuration.
And for those who use Pihole in its simplest form as an adblocker, Pihole can still represent a significant amount of time. Think about all those carefully curated adlists, regexes, and domain whitelists you've built up over the years. Do you really want to risk losing that work that may have taken you years?
A backup of your Pihole configuration allows you to quickly restore your network in case of a disaster such as a hardware failure, accidental deletion of files, or file corruption. This can save you a significant amount of time and hassle in getting your network back up and running and ensuring the service's continuity.
Furthermore, if you want to migrate your Pihole setup to a new device or network, having a backup of the configuration files will make the process much more seamless.
In summary, Pihole configuration backups are essential for protecting your network's settings and blocking lists, restoring your network in case of a disaster, and migrating your Pihole setup to a new device or network.
What Will Be Backed Up
- Domains
- Whitelist (exact/regex/wildcard)
- Blacklist (exact/regex/wildcard)
- Adlists
- Clients
- Groups
- Audit log
- Static DHCP Leases
- Local DNS Records (not just those set up in Pihole, but also any set up in dnsmasq config records stored in /etc/dnsmasq.d/ and /etc/hosts/)
- Local CNAME Records
- pihole-FTL.conf
- Pihole IP address (LOCAL_IPV4)
- Block_TTL
- setupVars.conf
- PIHOLE_INTERFACE
- DNSMASQ_LISTENING
- DNS Servers Queried By Pihole (PIHOLE_DNS_1, etc.)
What Won't Be Backed Up
- Pihole stats
- Query log
- Long-term data (query log, top lists, graphs, etc.)
How to Back Up Your Pihole Configuration
Thankfully, Pihole comes with a quick-and-easy tool known as Teleporter for making backups. This functionality is available via the web admin dashboard (web GUI) or the command line. There is no advantage or disadvantage to using one over the other.
Back Up Your Pihole Settings with the Web GUI
I recommend this approach for most people because if you have to use the web GUI to restore the Pihole backup (see below), you might as well use the same method to create the Pihole configuration backup.
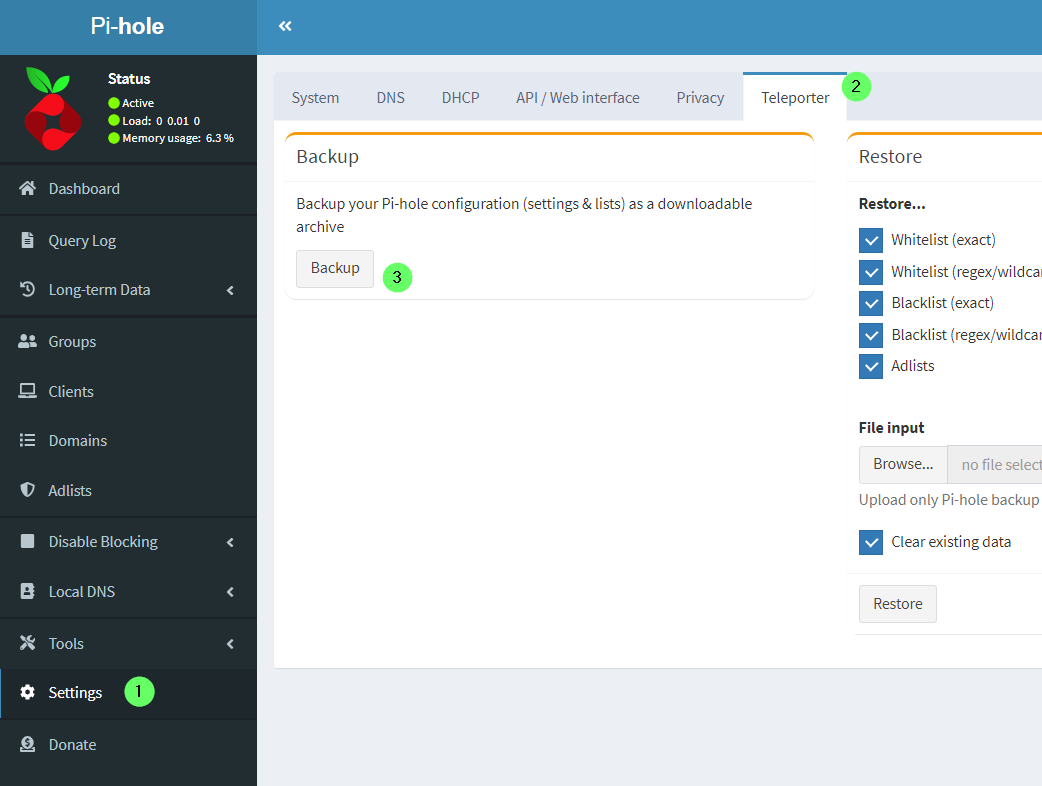
- Navigate to the Pi-hole admin dashboard by navigating to any of the following three locations in your web browser and logging in:
http://<IP_ADDRESS_OF_PIHOLE_SERVER_HERE>/admin/
http://pi.hole/admin (IF Pihole assigned as your DNS server)
http://pi.hole/ (IF Pihole assigned as your DNS server)
- Navigate to Settings > Teleporter > Backup. Your backup will download in the browser on your local computer. Store it someplace safe!
Back Up Your Pihole Settings from the Command Line
Backing up Pihole from the command line can be useful if you wish to automate your backups. Navigate to the directory where you want to save your backup and run the following command:
pihole -a -t
Your backup will be saved in the local directory.
Can I use the pihole -a -t command to back up Pihole to a specific file/directory?
You sure can. The above command, pihole -a -t will take a filepath as an argument. Note that I said "filepath"- the argument requires a filename, including the .tar.gz extension.
How to Restore Your Pihole Configuration from a Backup
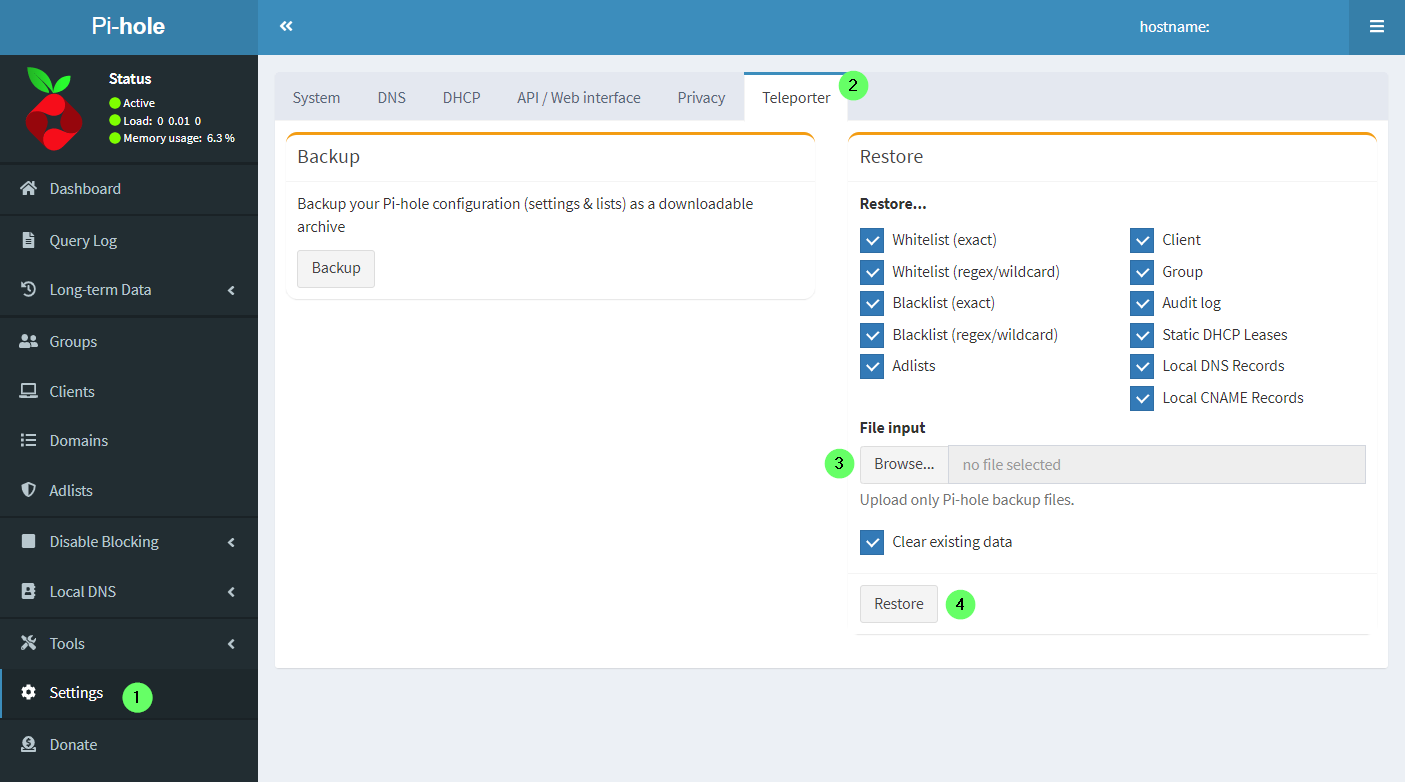
Restore Your Pihole Settings with the Web GUI
Same drill as before, when you created your Pihole config backup from the web GUI. Navigate to the Pi-hole admin dashboard > Settings > Teleporter. Only this time, instead of using the "Backup" side of the screen, you will use the "Restore" side on the right and upload your backup.
Restore Your Pihole Settings from the Command Line
Surprise! You can't! Pihole can only be restored from Teleporter in the Pihole web GUI.
If you have any questions or comments regarding the article, please feel free to post them below. I would love to hear your thoughts and feedback. Thank you for reading!