A tutorial on connecting a Raspberry Pi/Ubuntu web server to the internet. Includes how to set up ddclient for dynamic DNS and how to configure port forwarding on a router/pfSense.
In a previous post, we learned about what a reverse proxy web server is, why you would want one, and how to install the NGINX reverse proxy web server on a Raspberry Pi. Many of you have asked for additional updates on that article and it's high time I did them. In today's tutorial, I will guide you the rest of the way to getting your new RPi web server on the internet.
In order to connect our RPi web server to the internet, we need to do two things:
- Set up Dynamic DNS with ddclient on Raspberry Pi and Ubuntu so that web browsers can find us on the internet
- Enable port forwarding so that web traffic can access our web server
The Domain Name System (DNS)
What is the Domain Name System?
If you think of the internet as a giant ocean, your web server is but a small boat in its waters. When you visit a URL, how in the heck does the browser find your web server to connect to it? That is, how does it find that small boat in such a giant ocean? That's the job of domain name servers (DNS).
When you type a URL into your web browser, a domain name server is contacted which returns the IP address of the web server for that URL. It's for this reason that DNS is often described as the "phone book" of the internet- it's a registry that tracks the IP address of the web server for a given URL.
In order for visitors to visit our website, we therefore need to register our web server with a DNS. Since we're running a homelab, presumably we're using a residential ISP, which means we face one additional challenge: our IP address is not fixed and our ISP can (and will) change your IP address from time to time. This situation can be described as having a dynamic IP address.
Dynamic DNS with ddclient on Raspberry Pi and Ubuntu
As a consequence of having a dynamic IP address, we will need to notify the domain name servers when our IP address changes. Thankfully this can be easily accomplished with a tool called ddclient which we can install on our RPi (or any other Debian-based OS such as Ubuntu). ddclient is a service that runs on our server and retrieves our public (WAN) IP address. It then automatically publishes our IP address to the domain name server to keep it in sync so browser clients can find us.
Prerequisite:
To begin, you'll first need to purchase a domain name from Google Domains. Google Domains is simple to register, relatively cheap at <$20/yr, and since it's Google, you gain access to the most prolific domain name server in the world. Note that this isn't strictly necessary as there are free dynamic DNS providers out there but, since this is an introduction, I like to keep things simple and maximize our chances of success.
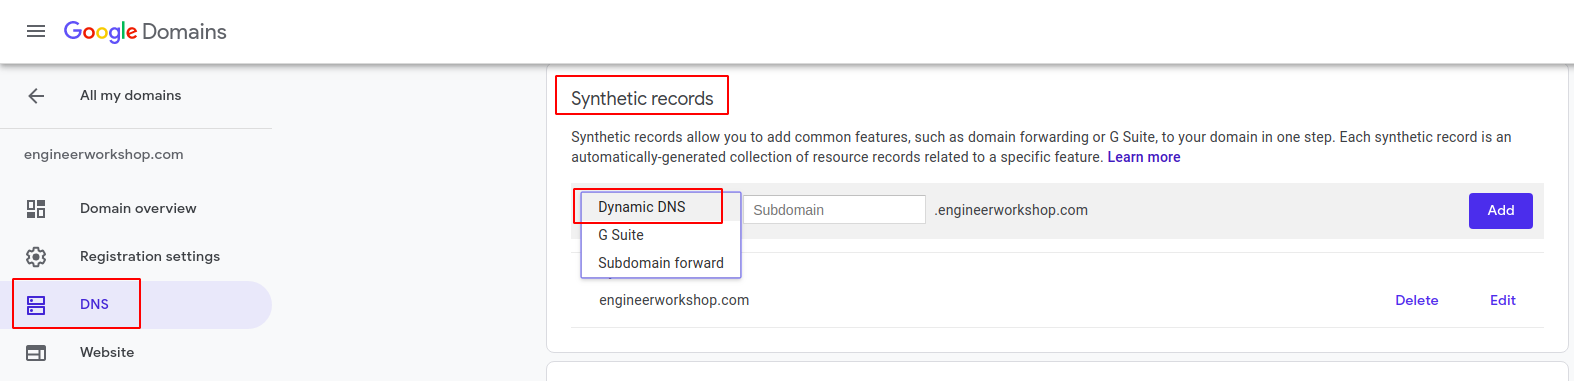
- Create a Dynamic DNS record in Google Domains by going to DNS > Synthetic records > Dynamic DNS. For the subdomain field you can either leave it blank or put @ in it to have Google track your web server on the root domain name:
- Retrieve the credentials generated:
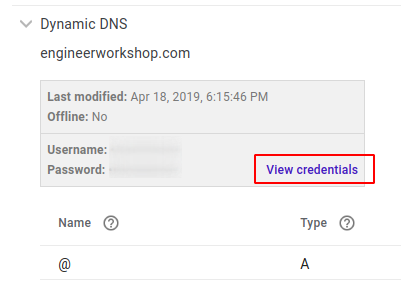
We'll need these for ddclient later.
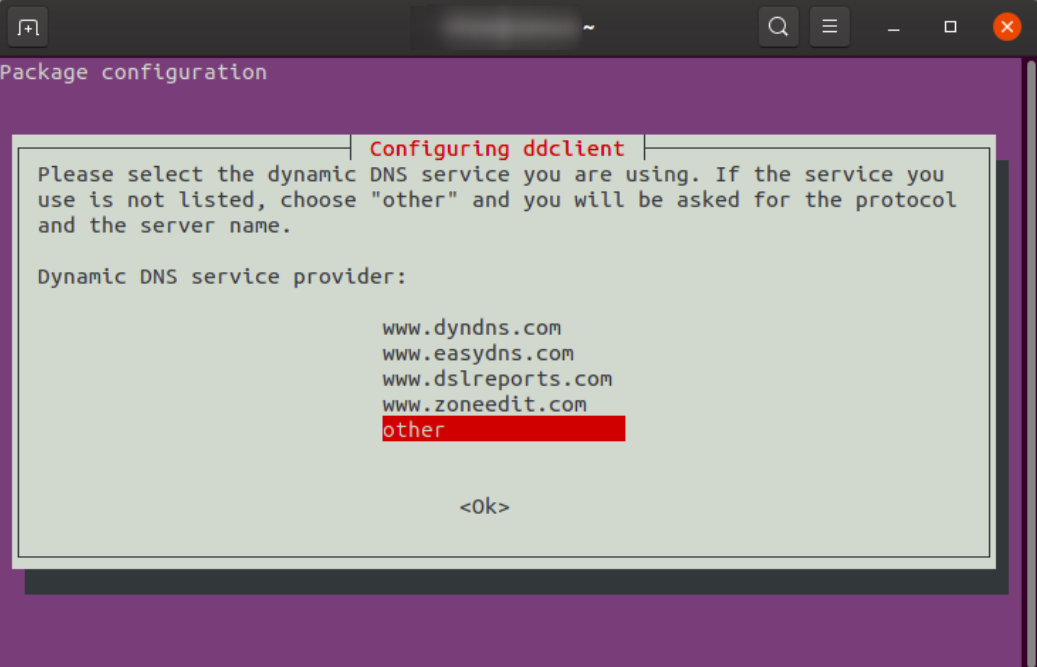
- Install ddclient on your RPi NGINX reverse proxy server with:
sudo apt install ddclient- If this is your first time installing ddclient, you'll be prompted to set up your dynamic DNS throughout the installation. Select "other" for your Dynamic DNS Provider:
- Enter google.domains.com as your Dynamic DNS Server:
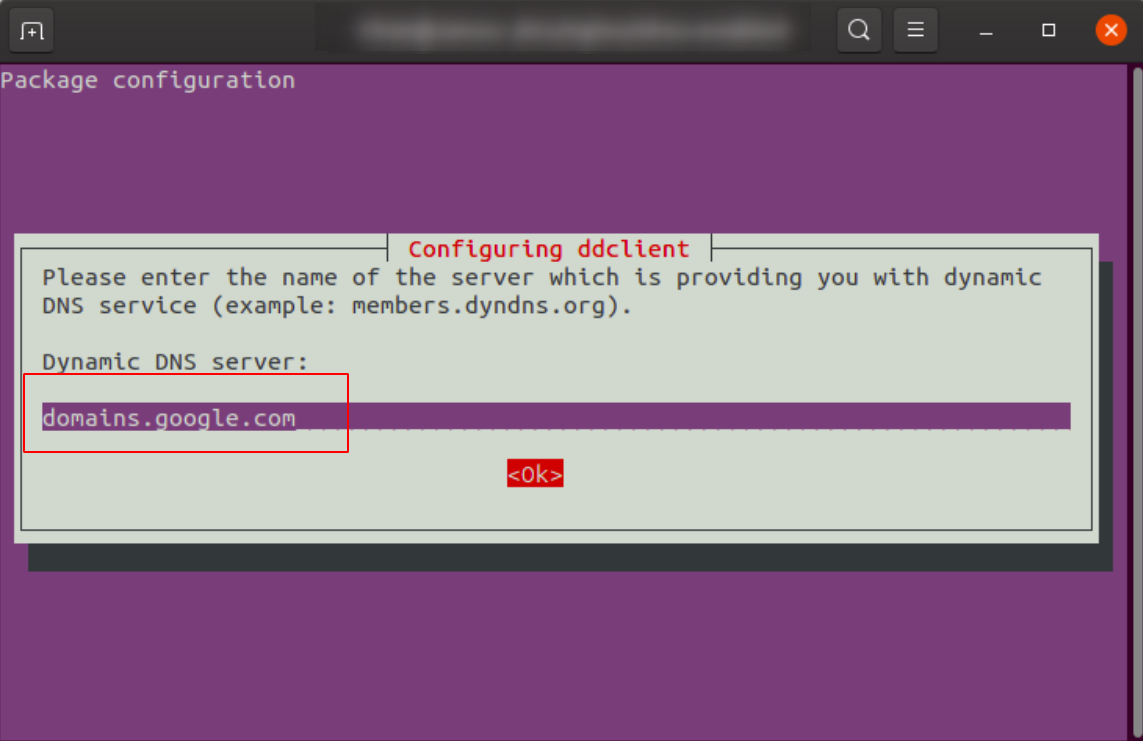
Honestly, these prompts don't matter too much since we're going to modify the config file directly anyway, but they give us a good starting point.
- Once installation completes, let's edit our ddclient config with:
sudo nano /etc/ddclient.conf- Edit /etc/ddclient.conf:
# Configuration file for ddclient generated by debconf
#
# /etc/ddclient.conf

daemon=300
protocol=dyndns2
use=web
server=domains.google.com
ssl=yes
login=<insert username from Step #2 (Google Domains) here>
password='<insert password from Google Domains here- KEEP SINGLE QUOTES'
<your domain name here>
Don't forget that last part with your domain name. In my case it simply ends with engineerworkshop.com:
# Configuration file for ddclient generated by debconf
#
# /etc/ddclient.conf

daemon=300
protocol=dyndns2
use=web
server=domains.google.com
ssl=yes
login=
password=''
engineerworkshop.com
Now, I think a little explanation is in order for the lines we've added:
- The daemon line simply tells the ddclient daemon how often to check for changes in our public IP address and notify the domain name server (if necessary). I think 5 minutes is a reasonable value.
- use=web tells ddclient to retrieve our public WAN address using one of the many "what is my IP address" websites.
- ssl=yes tells ddclient to use SSL when connecting to Google Domains (always a good idea to use SSL when you can).
- Open the ddclient defaults with:
sudo nano /etc/default/ddclient- Set ddclient to run in daemon mode by updating this file to:
run_daemon="true"
daemon_interval="300"- Make sure that the ddclient service is running:
sudo systemctl start ddclient- Test our ddclient configuration with the following command:
sudo ddclient -daemon=0 -debug -verbose -noquietYou should receive the following message:
SUCCESS: engineerworkshop.com: skipped: IP address was already setGoing back to Google Domains and looking at your Dynamic DNS record should also show your public IP address.
Port Forwarding
Great, now clients can find us on the internet and be routed to our web server via the IP address. Now, if they visit your new domain name URL or just type in the IP address, they'll splatter against your router like a bug on a windshield if we don't make any additional changes.
Why? Because the web traffic ports on your router are closed. By default, web traffic is carried on port 80 (for http traffic) and 443 (for https traffic). When you access a web site, you are accessing the server not only on an IP address, but also on these two ports.
For security reasons, these ports are closed to outside WAN traffic on your router. We need to not only open these ports, but we also need to tell your router where to send this traffic on your internal network. More specifically, we need to tell it to forward the traffic to your web server- this is known as port forwarding.
- Find your RPi's internal (private) IP address. This can be found with the following command:
ifconfigNote: You will need to install net-tools to use this command which is simple enough with:
sudo apt install net-tools
- Forward outside web traffic to this IP address.
This is accomplished on the router. How you actually do this is specific to your manufacturer and router, but in general what you're trying to do is say this:
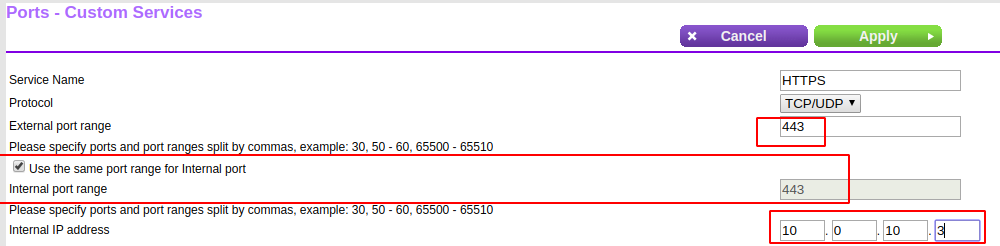
Take all traffic FROM port 80 and FORWARD it to port 80 on your reverse proxy server's IP address (so in my case this would be written at 10.0.10.3:80).
I think the way pfSense lays out its port forward rules illustrates this best:
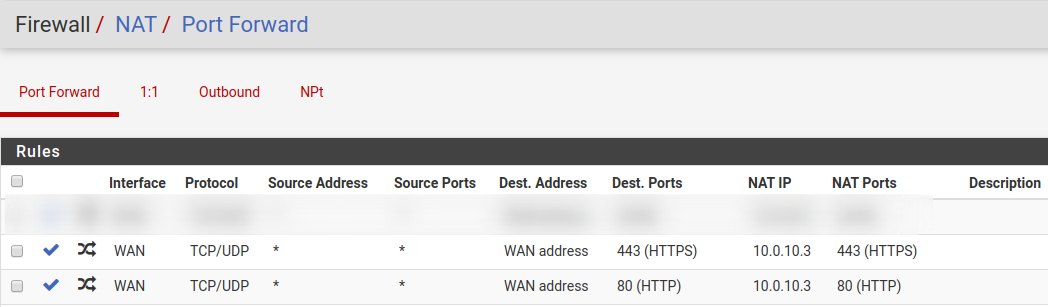
What these port forward rules literally say is that, on the WAN interface, for any IP address on any port (* source address and * source ports) bound for our public IP address (WAN address) and HTTP/HTTPS ports (80 and 443 destination ports), forward that traffic along to 10.0.10.3 on ports 80 and 443 respectively.
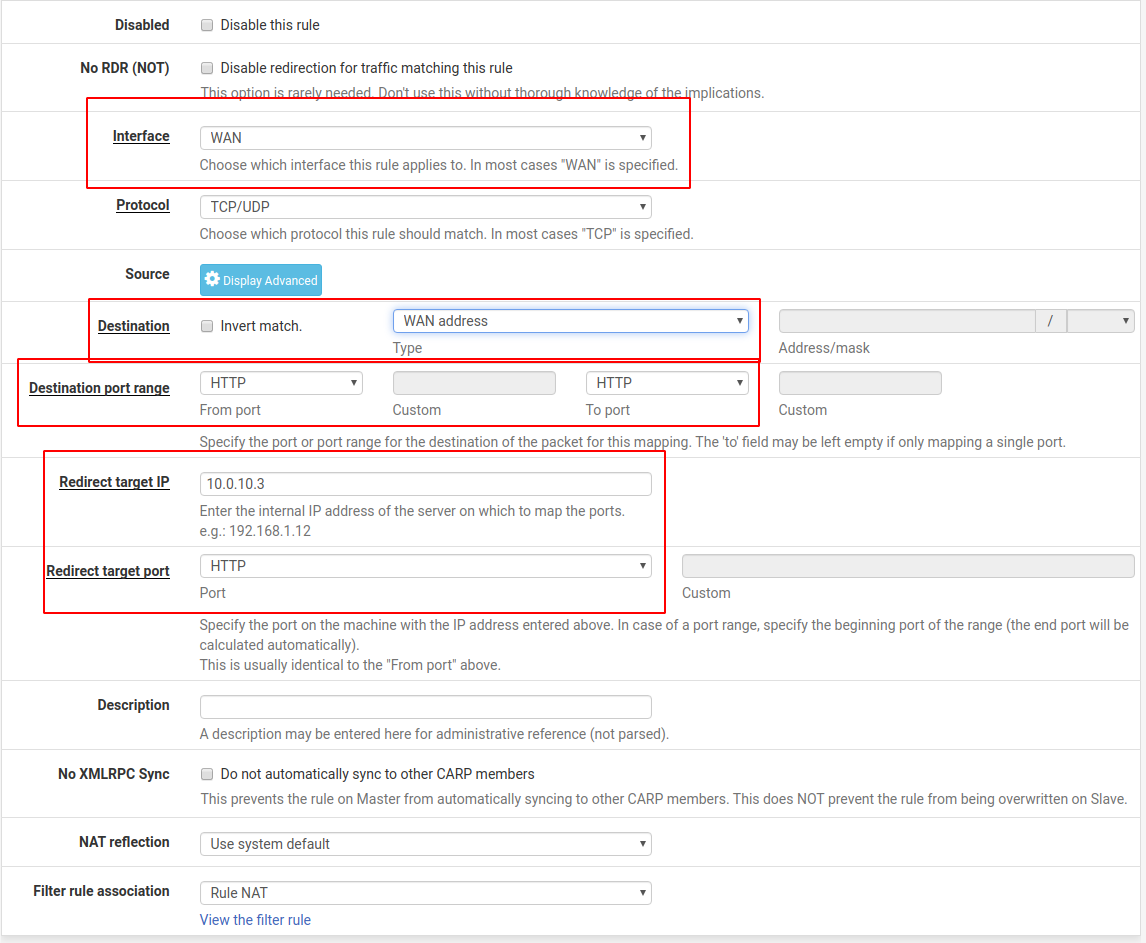
If you are in fact using pfSense as your firewall/router, to create the above rules, we simply need to add an entry to the port forward settings found under Firewall > NAT. An individual entry will look like so:
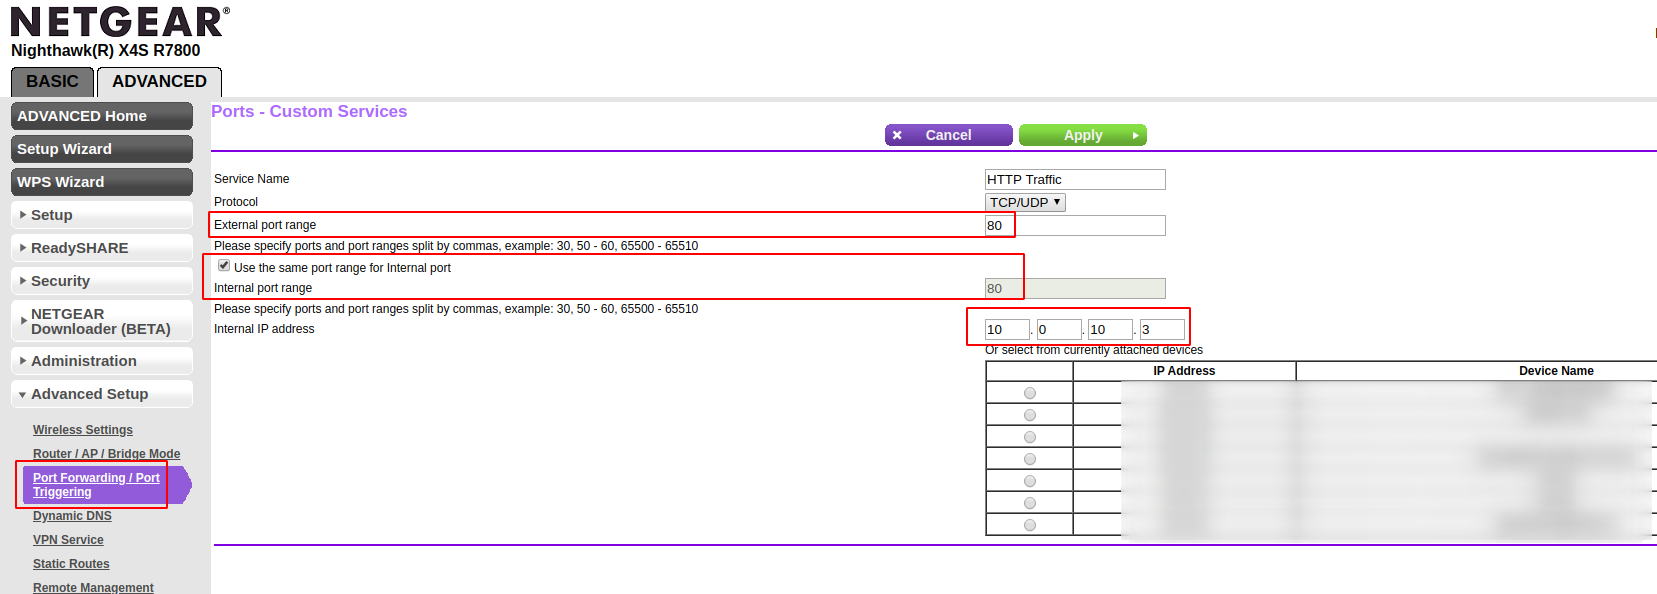
If you're on a regular consumer router, such as a Netgear Nighthawk, you will navigate to the Port Forwarding settings (found under the Advanced tab) and add the following entry to forward HTTP (port 80) traffic to port 80 on your web server:
While you're at it, you might as well do the same for HTTPS (port 443) traffic:
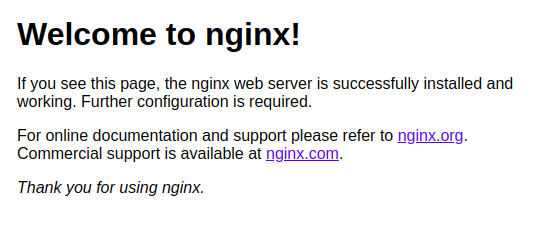
That's it! Your NGINX web server is now on the internet. You can test this by typing in your public IP address into your browser and, if everything is working, you should be presented with the default NGINX page:
If you already have a web server serving actual content, don't forget to add your new domain name as an entry in the NGINX reverse proxy!
As always, if you have any questions or comments, please ask! I will do my best to answer them.