
WireGuard is rapidly becoming the go-to VPN, with even Linus Torvalds himself praising it. In fact, Torvalds is such a fan, he has merged it directly into the Linux kernel. But why is WireGuard receiving so much praise and should you use it? Keep reading to find out.
Update: This guide was written for installing WireGuard on the Raspberry Pi. I have since written a guide specific to installing WireGuard on Ubuntu:

WireGuard VPN Overview
Benefits of WireGuard
- Performance and Speed: In benchmarks, WireGuard outclasses both OpenVPN and IPsec in not only throughput, but also latency.
- Ease of Deployment: Setting up a VPN can sometimes be a bit of a bear. With WireGuard, setting up the VPN server is easy and only takes a few steps. It'll take even fewer steps when the WireGuard packages find their way into Raspbian.
- Security: A VPN makes your remote laptop just another device on the network, just as if you were at home. In doing so, this allows you to access all of your network's resources locally. If you don't utilize a VPN, then you have to port forward to make your homelab's local resources available over the internet. Do this enough times and the firewall that separates your home network from the internet starts to look like swiss cheese with all of the holes you've punched through it with those port forwards. VPNs allow you to minimize your network's attack surfaces to a single (very secure) port forward for the VPN server. WireGuard uses the latest, state-of-the-art cryptography.
- Low overhead -> Better Battery Life: WireGuard, as described by its developer, isn't a chatty protocol. The client sends its request and then shuts up. It tries to avoid keep alive handshakes if they're not needed. As a result, when you're working on a laptop on wireless, your wireless card has a higher likelihood of being able to idle down which leads to better battery life. (An idle wifi card uses something like ~20 mW at idle but can easily climb to ~2W under load). Anecdotally, in my own testing, I have noticed a significant improvement in battery life when working remotely on WireGuard compared to OpenVPN.
How The WireGuard VPN Tunnel Works
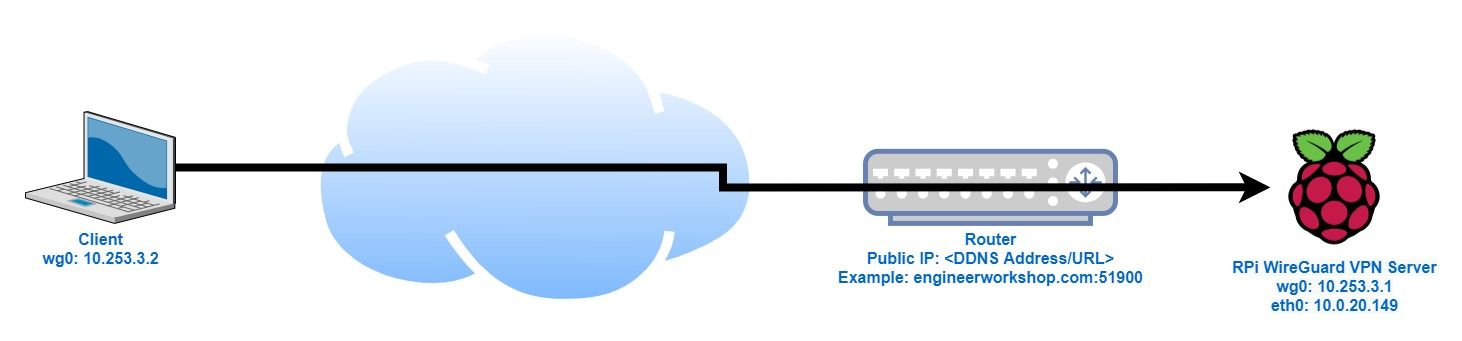
The above diagram depicts how setting up the WireGuard VPN tunnel works with a Raspberry Pi. With WireGuard, a tunnel is created with a virtual network interface (wg0 in this case). These interfaces are created on both the client and on the RPi VPN server, enabling them to talk to each other.
In order for the client to be able to locate the RPi VPN server across the internet, a dynamic DNS provider is required. This allows us to track our homelab's public IP address with a URL. When our WireGuard client requests the URL, an IP address is returned corresponding to our router's WAN address. In my case, I simply use this site's URL (engineerworkshop.com) since I am self hosted.
In a process known as port forwarding, when our WireGuard client sends a request to engineerworkshop.com on port 51900, the router takes that request and forwards it on to the Raspberry Pi, connected to the router on eth0 with IP address 10.0.20.149 also on port 51900. This is a form of network address translation (NAT).
Prerequisites
- Raspberry Pi (or any other Debian-based machine; an Ubuntu VM will also work)
- DDNS (dynamic domain name service)
As mentioned previously, a DDNS service is required to track your Raspberry Pi (i.e. your new WireGuard server) so that your client can find your server. This can be in the form of a formal domain name, such as the one you use if you are self-hosting a website like I am. If you're interested in doing this, more information can be found here:

You do not need to purchase a domain name for this and alternatively you can use one of the widely available (and free) DDNS services such as no-IP and Duck DNS. Ultimately, we just need some way of knowing what your RPi's public (WAN) IP address is.
Install WireGuard On The Raspberry Pi
Update: It appears that the Raspbian repository now natively includes WireGuard. If you've recently just set up your Raspberry Pi, it's likely that you can skip the steps in this section and just install WireGuard with the command below and then move on to the configuring the WireGuard server section:
sudo apt install wireguardIf this doesn't work, or you're using an older Raspberry Pi install, continue with the directions below.
1. Currently, WireGuard is not included in the Raspbian distribution, therefore we will need to add the Debian repo:
echo "deb http://deb.debian.org/debian/ unstable main" | sudo tee --append /etc/apt/sources.list2. Next, install the Debian distro keys:
sudo apt-key adv --keyserver   keyserver.ubuntu.com --recv-keys 04EE7237B7D453EC
sudo apt-key adv --keyserver   keyserver.ubuntu.com --recv-keys 648ACFD622F3D138
3. Prevent RPi from using the Debian distro for normal Raspbian packages:
sudo sh -c 'printf "Package: *\nPin: release a=unstable\nPin-Priority: 90\n" > /etc/apt/preferences.d/limit-unstable'4. Update your package list:
sudo apt-get update5. Install WireGuard:
sudo apt install wireguardSet Up and Configure the WireGuard VPN Server
Generate security keys
To ensure that not just anyone gets access to our network and ensure a secure connection, we'll first need to generate a set of public/private key pairs with the following commands (execute them one line at a time in your RPi):
sudo su
cd /etc/wireguard
umask 077
wg genkey | tee server_private_key | wg pubkey > server_public_key
wg genkey | tee client_private_key | wg pubkey > client_public_key
Retrieve the keys generated above with:
cat server_private_key
cat server_public_key
cat client_private_key
cat client_public_key
We'll need these for later when we create the server and client configuration files below.
Generate server configuration (wg0.conf)
If you followed the directions above, you should currently be logged in as root and in the /etc/wireguard directory. Next, create the WireGuard Server configuration with:
nano wg0.confAnd add the following:
[Interface]
Address = 10.253.3.1/24
SaveConfig = true
PrivateKey = <insert server_private_key>
ListenPort = 51900

PostUp = iptables -A FORWARD -i %i -j ACCEPT; iptables -A FORWARD -o %i -j ACCEPT; iptables -t nat -A POSTROUTING -o eth0 -j MASQUERADE
PostDown = iptables -D FORWARD -i %i -j ACCEPT; iptables -D FORWARD -o %i -j ACCEPT; iptables -t nat -D POSTROUTING -o eth0 -j MASQUERADE

[Peer]
PublicKey = <insert client_public_key>
AllowedIPs = 10.253.3.2/32
Gotchas:
Be sure to replace the key values in the configuration for PrivateKey and PublicKey.
Note that the above configuration assumes you are using a wired ethernet connection on your RPi WireGuard server. If you instead wish to use wifi (wlan0), change the above config to use -o wlan0 in PostUp and PostDown. See this forum post for additional information.
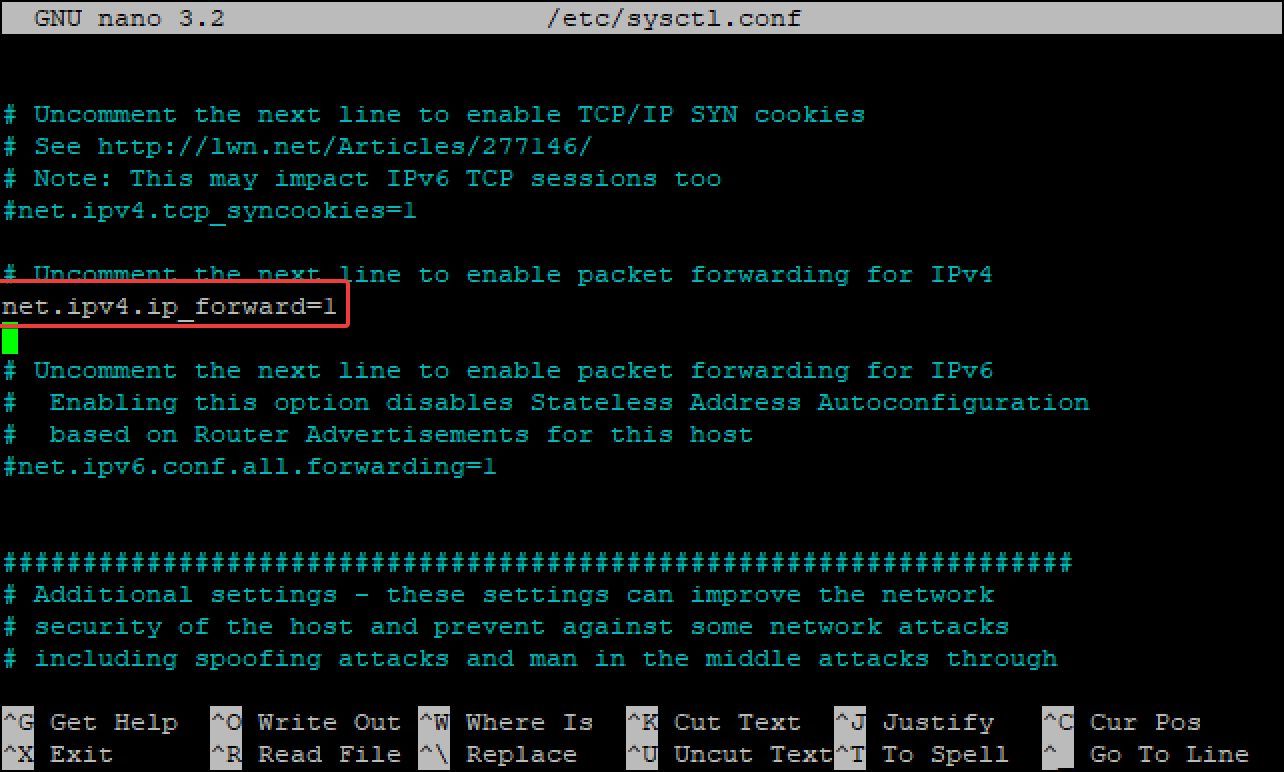
Enable IP Forwarding on the Server
Edit sysctl.conf on the Raspberry Pi with:
nano /etc/sysctl.confUncomment the line with "net.ipv4.ip_forward=1" and save.
Start Up WireGuard
Set up WireGuard to start automatically on reboot:
systemctl enable wg-quick@wg0
chown -R root:root /etc/wireguard/
chmod -R og-rwx /etc/wireguard/*
Reboot your RPi for all of your changes to take effect.
Set Up Port Forwarding On The Router
Finally, to enable our local client to be able to access our new Raspberry Pi WireGuard server, we need to set up our router to forward any traffic it receives on port 51900 to our Raspberry Pi. This is known as port forwarding and the set up varies from router to router. For an additional reference, see this guide on setting up port forwarding.
In my case, since I'm using a pfSense firewall, I will show you what it looks like on my router:
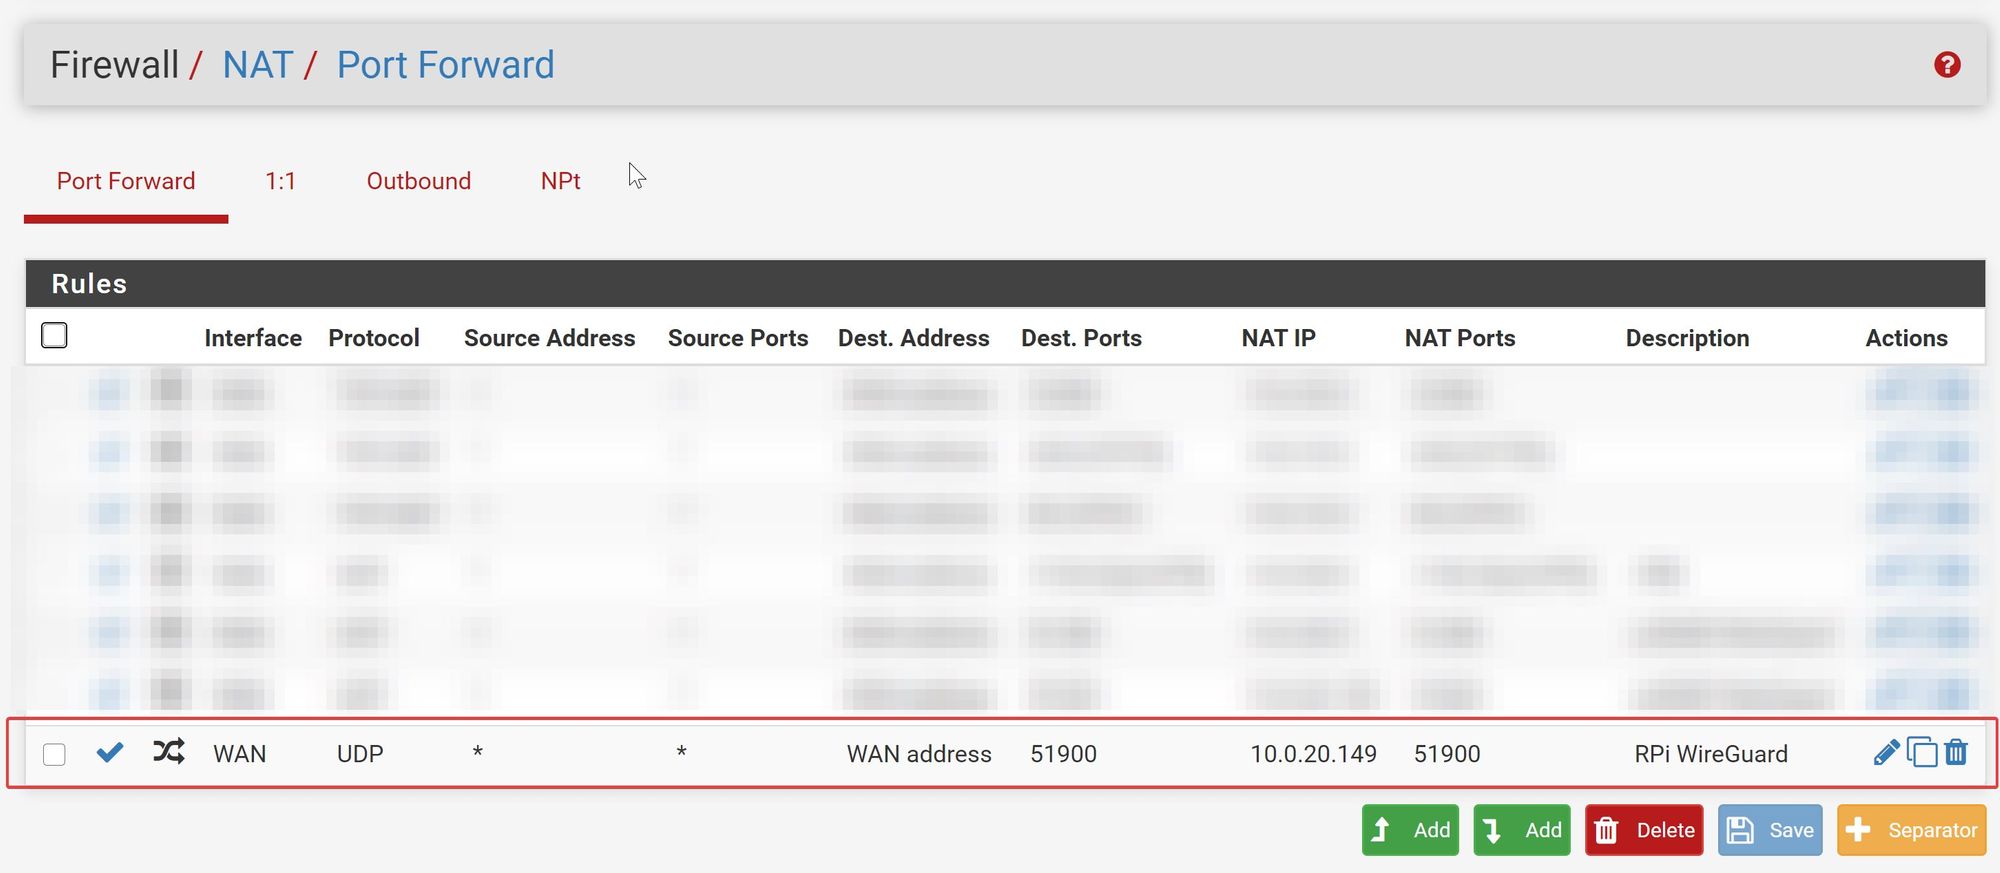
The above port forwarding rule says that any traffic with a destination of the WAN address (i.e. our public IP address) and port 51900, take that traffic and forward it to 10.0.20.149 on port 51900. You'll most likely have to change this IP address to whatever the IP address is of your Raspberry Pi.
Set Up the WireGuard Client
Generate the WireGuard Client Configuration (wg0-client.conf) File
On your client, create the client configuration file, wg0-client.conf. This can be done using Notepad, if you'll be connecting from Windows, or nano if you're using Ubuntu/Linux:
[Interface]
Address = 10.253.3.2/32
PrivateKey = <insert client_private_key>
DNS = 1.1.1.1

[Peer]
PublicKey = <insert server_public_key>
Endpoint = <insert vpn_server_address>:51900
AllowedIPs = 0.0.0.0/0, ::/0
Aside from adding the client private key and server public key above, you'll also need to substitute your "VPN server's WAN address", i.e. your DDNS URL (ex: no-IP, DuckDNS, etc.).
Note that if you're also using Linux as your client (i.e. you're connecting from another Raspberry Pi), the above should be created in the /etc/wireguard/ directory.
If you're using Windows, it doesn't much matter where you put your wg0-client.conf file since you'll use the Windows WireGuard client to navigate and select it anyway.
(See client configuration information below).
Connecting To Your New WireGuard VPN Tunnel
With your new client configuration (wg0-client.conf) file created, if your client is also a Linux client, check out the following guide for how to connect to your new RPi WireGuard VPN server:

If you're on a Windows machine, jump to step 10 of the following guide:

Changelog
Update (3/4/20): If you have your WireGuard configuration set improperly, WireGuard can leak if you're using an IPv6 internet connection (common if you're using a cellular hotspot). I have updated the client configuration above to fix the issue. You can read more about the WireGuard IPv6 leak issue on a cellular hotspot in the forum.
Update (4/16/20): If you are using your Raspberry Pi's wireless connection (as opposed to the wired ethernet connection) for your WireGuard tunnel, you'll need to alter the server config slightly and change the -o eth0 piece to -o wlan0 in PostUp and PostDown. See this forum post for additional information.
Update (9/4/20): If you've just recently installed Raspbian, and are using the latest version, it appears that the WireGuard package is now included in the Raspbian repository and can simply be installed with sudo apt install wireguard