
With WireGuard now officially supported by Ubuntu and integrated into the Linux kernel, I’ve decided it’s high time to for dedicated guide on how to set up a WireGuard VPN server on Ubuntu.
A VPN is an essential feature of any homelab as it allows you to access your network remotely for both emergency maintenance and routine use. Arguably, the best-in-class VPN service is WireGuard, which I now use exclusively for reasons that will be outlined below.
I have written multiple articles already on implementing WireGuard on the Raspberry Pi and on unRAID, but unfortunately, not all homelabs will have these. However, it's almost guaranteed that in any given homelab, there will be an Ubuntu server somewhere. Therefore, today's guide will focus on how to install the WireGuard VPN on an Ubuntu Linux server.
A Note From the Author
First of all, please don't be overwhelmed by the length of this guide, I wrote it to be as "beginner friendly" as possible. My goal being that not only will the guide give you the best possible chance of actually getting your WireGuard VPN to work (which I assume is why you're here in the first place), but also to help you understand the reason why you're doing something in the first place.
Far too many other tutorials simply skip over this explanation which ultimately robs the reader of any real understanding of what they're doing. I believe that exposure to new ideas and the explanation of concepts serves the reader best of all in the long run. Therefore, I have tried my best to not make any assumptions about any background knowledge you might not yet have (but I am confident you will one day learn). It's this kind of knowledge and understanding that will allow you to troubleshoot and fix problems that you could not otherwise anticipate. The mark of a good physician/engineer/sysadmin is to know what to do when the flowchart ends.
For those more experienced readers, feel free to just skip to the steps and ignore the explanation in between.
Additionally, since Ubuntu is a Debian-based distribution, this guide will likely look familiar to those of you who have read my guide on installing a WireGuard VPN server on the Raspberry Pi (the RPi's Raspbian OS also being Debian-based):

There are some slight differences in instructions and so I have updated this guide specifically for Ubuntu. Additionally, like all my guides, I have tested the procedures in this guide from start to finish to make sure they actually work for Ubuntu specifically.
Let's get going!
WireGuard VPN Overview
Why Should I Implement WireGuard?
- Convenience: If you're working remotely, a VPN makes your laptop just another device on the remote network, just as if you were at home. In doing so, this allows you to access all of your remote network's resources locally.
- Security: If you don't utilize a VPN, then you have to use port forwarding to make specific homelab resources available over the internet. Do this enough times and the firewall that separates your home network from the internet starts to look like swiss cheese with all of the holes you've punched through it with those port forwards. VPNs allow you to minimize your network's attack surfaces to a single (very secure) port forward for the VPN server. WireGuard uses the latest, state-of-the-art cryptography.
- Redundancy: As I have spoken about in the past, a VPN is an essential component of the Unattended Server Checklist. It allows you access to your homelab in the event that something happens and you need to remote in.
Benefits of WireGuard vs. Other VPNs
- Performance and Speed: In benchmarks, WireGuard outclasses both OpenVPN and IPsec in not only throughput, but also latency.
- Ease of Deployment: Setting up a VPN can sometimes be a bit of a bear. As you'll see, with WireGuard, setting up the VPN server is easy and only takes a few steps. This is especially true now that WireGuard has been directly integrated into the Linux kernel and is now in the official Ubuntu repository.
- Low overhead -> Better Battery Life: WireGuard, as described by its developer, isn't a chatty protocol. The client sends its request and then shuts up. It tries to avoid keep alive handshakes if they're not needed. As a result, when you're working on a laptop on wireless, your wireless card has a higher likelihood of being able to idle down which leads to better battery life. (An idle wifi card uses something like ~20 mW at idle but can easily climb to ~2W under load).
How The WireGuard VPN Tunnel Works
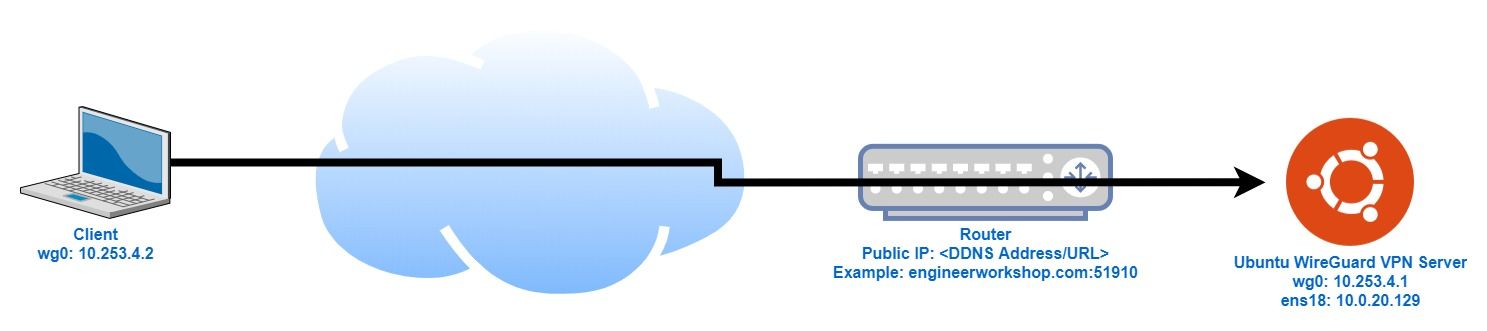
To help you understand what we’re going to accomplish in today’s guide, the above diagram depicts how the WireGuard VPN tunnel set up works. With WireGuard, a tunnel is created with a virtual network interface (wg0 in this case). This interface is created on both the client and on our Ubuntu WireGuard VPN server, enabling the two devices to talk to each other.
In order to allow the client (i.e. a laptop) to locate our WireGuard VPN server on the internet, a dynamic DNS provider is required. This dynamic DNS provider (also referred to as a DDNS) allows us to track the server's public IP address with a URL. When the WireGuard client requests the URL, an IP address is returned corresponding to our router's WAN address. In my case, since this blog is self-hosted, I simply use this site's URL (engineerworkshop.com).
Additionally, I have my pfSense router/firewall set to listen to port 51910 for the WireGuard connection. In a process known as port forwarding, when our WireGuard client sends a request to engineerworkshop.com on port 51910, the router takes that request and forwards it on to the Ubuntu server, which is connected to the router on ens18 with IP address 10.0.20.129 and also listening on port 51910. This is a form of network address translation (NAT).
Prerequisites
- Ubuntu Server- This can be any device running Ubuntu; it doesn't have to be a true "server". It also doesn't have to be the true Ubuntu Server install; the Ubuntu Desktop install will work just as well.
- DDNS (Dynamic Domain Name Service)
As mentioned previously, a DDNS service will be required to track your Ubuntu server's public IP address so that your client can find it on the internet. This can be accomplished with a formal domain name, such as the one you would use if you are self-hosting a website like I am. If you're interested in doing this, more information can be found here:

Alternatively, you need not purchase a domain name and can instead use of the widely available (and free) DDNS services such as no-IP and Duck DNS. Ultimately we just need some way of knowing what your server's public (WAN) IP address is. Note that many routers also support this functionality.
Install WireGuard on Ubuntu
Now that WireGuard is officially supported by Ubuntu, if you’re running a version of Ubuntu >=19.10, you can simply install WireGuard from the repository with:
sudo apt install wireguardIf you're running a version prior to 19.10, you'll need to add the PPA:
sudo add-apt-repository ppa:wireguard/wireguard
sudo apt-get update
sudo apt-get install wireguard
Set Up and Configure the WireGuard VPN Server
Generate security keys
In order to authenticate and secure our WireGuard connection, we'll need to generate a set of public/private key pairs with the following commands:
sudo su
cd /etc/wireguard
umask 077
wg genkey | tee server_private_key | wg pubkey > server_public_key
wg genkey | tee client_private_key | wg pubkey > client_public_key
Retrieve the keys generated above with:
cat server_private_key
cat server_public_key
cat client_private_key
cat client_public_key
We'll need these for later when we create the server and client configuration files below.
Generate server configuration (wg0.conf)
Now that we have the requisite security keys, we'll start by creating the WireGuard server configuration with:
nano wg0.confNote that if you've been following the steps of this guide in order, this should create wg0.conf in /etc/wireguard/ with root ownership.
And adding the following:
[Interface]
Address = 10.253.4.1/24
SaveConfig = true
PrivateKey = <insert server_private_key>
ListenPort = 51910

PostUp = iptables -A FORWARD -i %i -j ACCEPT; iptables -A FORWARD -o %i -j ACCEPT; iptables -t nat -A POSTROUTING -o ens18 -j MASQUERADE
PostDown = iptables -D FORWARD -i %i -j ACCEPT; iptables -D FORWARD -o %i -j ACCEPT; iptables -t nat -D POSTROUTING -o ens18 -j MASQUERADE

[Peer]
PublicKey = <insert client_public_key>
AllowedIPs = 10.253.4.2/32
Gotchas:
Be sure to replace the key values in the configuration for PrivateKey and PublicKey.
Also note that the above configuration assumes your network adapter is named ens18. Since my server is running as a virtual machine, chances are that your network adapter is not similarly named and you will need to substitute -o <network adapter name here> for -o ens18 in PostUp and PostDown.
If you need help identifying the name of your network adapter (and perhaps even finding your assigned local IP address which we'll need later), here is a handy trick. Run the following command:
sudo ifconfigThis command should return the following:
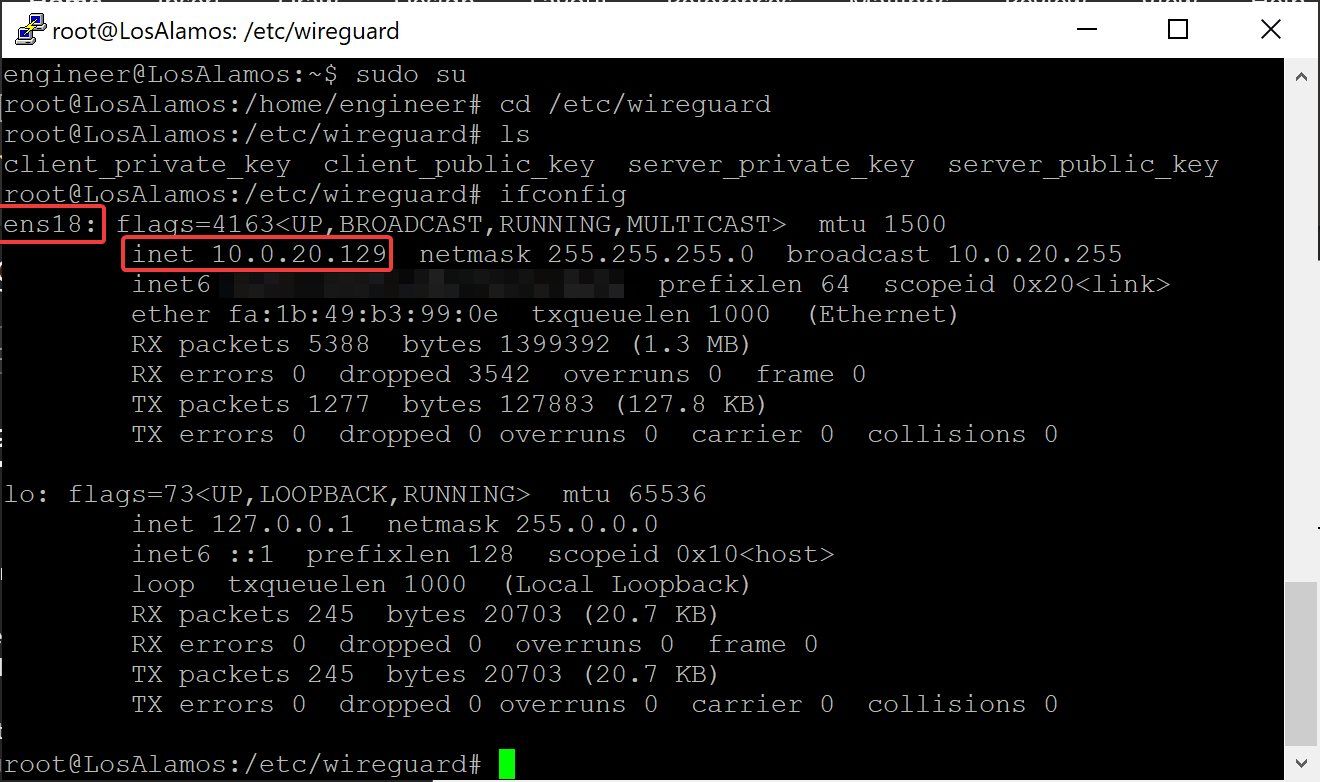
The leftmost box, highlighted in red, contains the name of your network adapter, in my case ens18. Whatever name appears here for you is what you'll need to substitute in for ens18 in the configuration above.
Your local (internal/LAN) IP address is highlighted below it in the inet box. We'll need that for later when we set up port forwarding on the router.
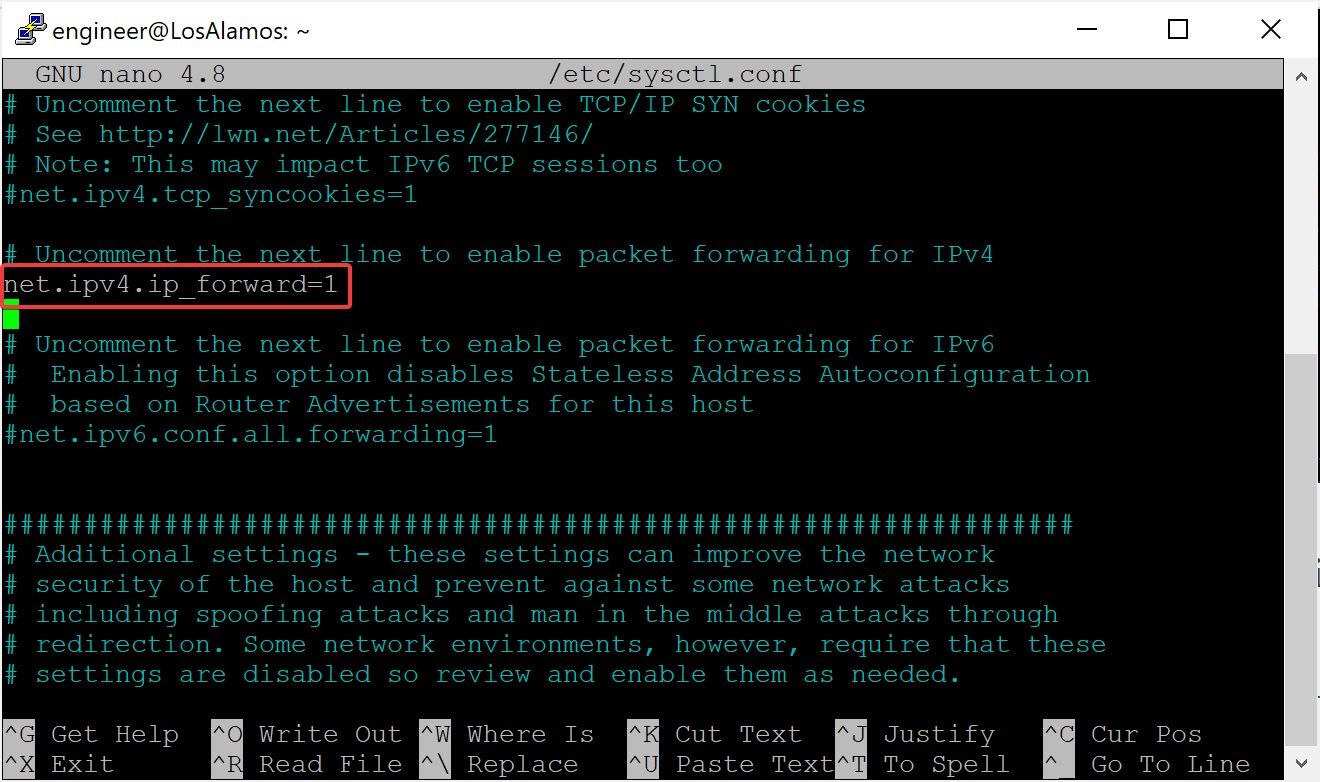
Enable IP Forwarding on the Server
IP forwarding allows the operating system to forward packets, in essence allowing the OS to operate as a router. Since most Linux distributions, Ubuntu included, disable IP forwarding by default, we'll need to enable it.
Edit sysctl.conf on the server with:
nano /etc/sysctl.confUncomment the line with "net.ipv4.ip_forward=1" and save:
Start Up WireGuard
Set up WireGuard to start automatically on reboot:
systemctl enable wg-quick@wg0
chown -R root:root /etc/wireguard/
chmod -R og-rwx /etc/wireguard/*
Reboot your Ubuntu server for all changes to take effect.
Set Up Port Forwarding On The Router
Finally, to enable our local client to be able to access our new WireGuard server, we need to set up our router to forward any traffic it receives on port 51910 to our Ubuntu server. This is known as port forwarding and the set up varies from router to router. For an additional reference, see this guide on setting up port forwarding.
In my case, since I'm using a pfSense firewall, I will show you what it looks like on my router as a guide:
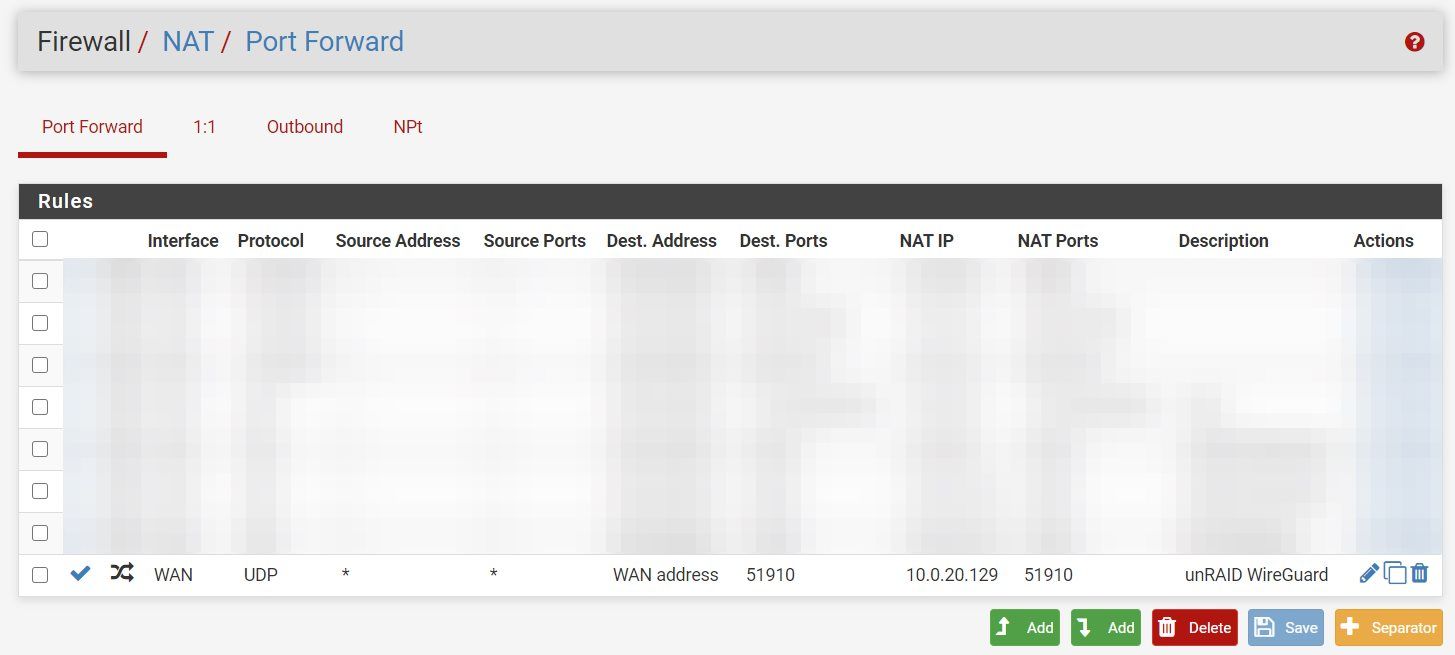
The above port forwarding rule says that any traffic with a destination of the WAN address (i.e. our public IP address) and port 51910, take that traffic and forward it to 10.0.20.129 on port 51910. You'll most likely have to change this IP address to whatever the IP address is of your Ubuntu server.
Set Up the WireGuard Client
Generate the WireGuard Client Configuration (wg0-client.conf) File
On your client, create the client configuration file, wg0-client.conf. This can be done using Notepad, if you'll be connecting from Windows, or nano if you're using Ubuntu/Linux:
[Interface]
Address = 10.253.4.2/32
PrivateKey = <insert client_private_key>
DNS = 1.1.1.1

[Peer]
PublicKey = <insert server_public_key>
Endpoint = <insert vpn_server_address>:51910
AllowedIPs = 0.0.0.0/0, ::/0
Aside from adding the client private key and server public key above, you'll also need to substitute your "VPN server's WAN address", i.e. your DDNS URL (ex: no-IP, DuckDNS, etc.).
Note that if you're also using Linux as your client (i.e. you're connecting from another Raspberry Pi), the above should be created in the /etc/wireguard/ directory.
If you're using Windows, it doesn't much matter where you put your wg0-client.conf file since you'll use the Windows WireGuard client to navigate and select it anyway.
(See client configuration information below).
Connecting To Your New WireGuard VPN Tunnel
With your new client configuration (wg0-client.conf) file created, if your client is also a Linux client, check out the following guide for how to connect to your new Ubuntu WireGuard VPN server:

If you're on a Windows machine, jump to step 10 of the following guide:

Troubleshooting
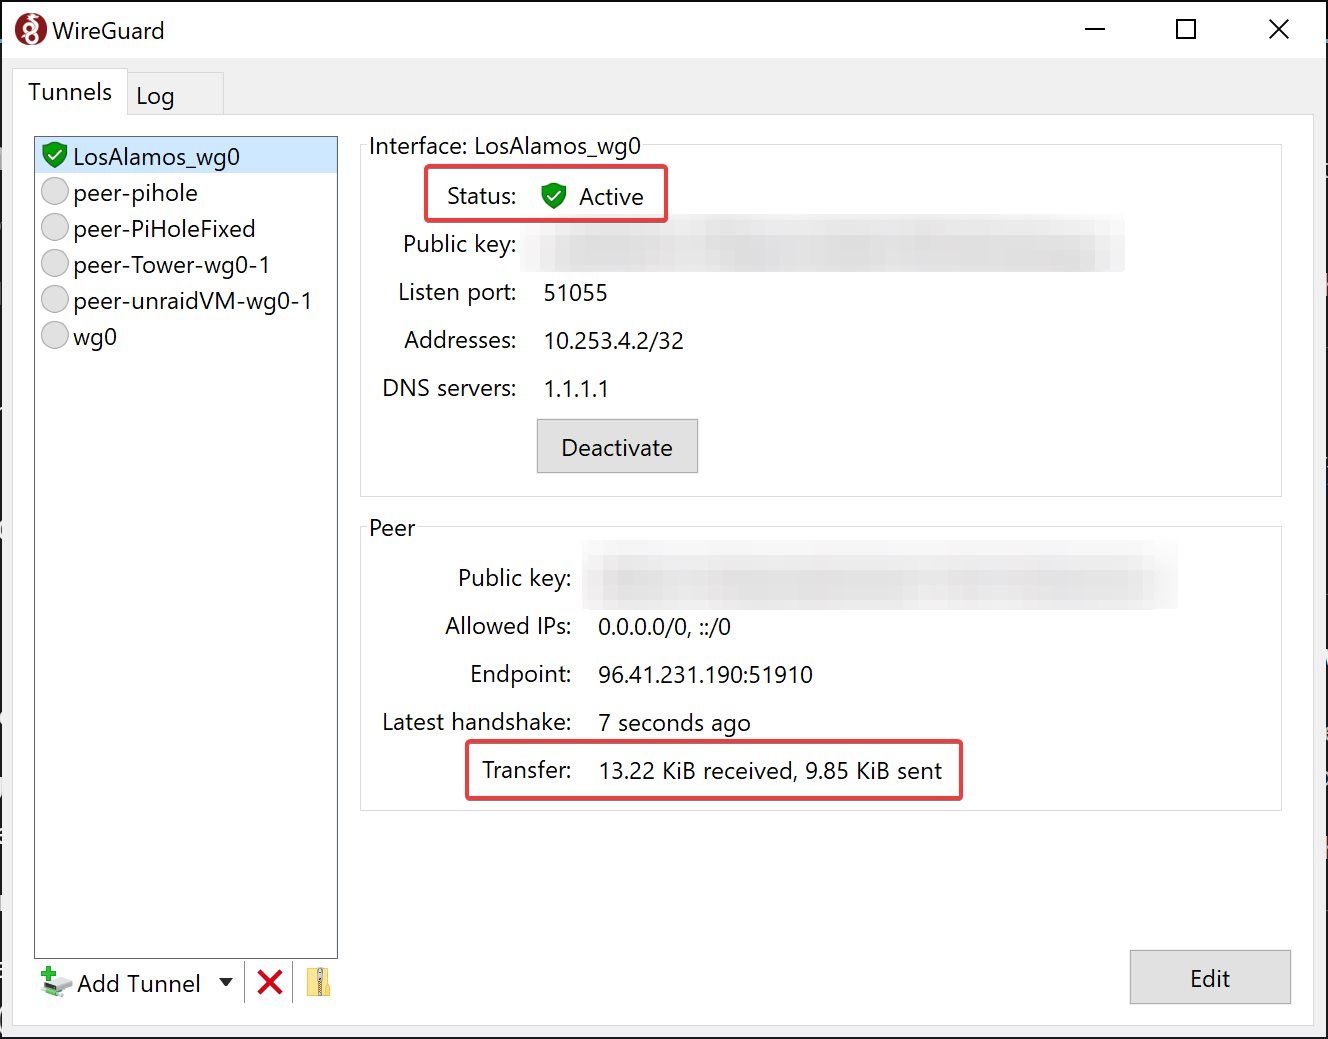
How To Check To See If WireGuard Is Connected from the Client
The easiest way to check to see if your connection is working is to simply look at the WireGuard client, looking for active data transfer:
If you're on a Linux client, a similar output can be obtained with the following command:
sudo wg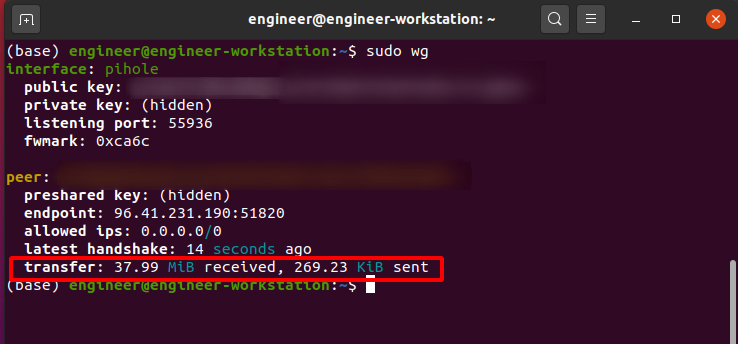
Checking the WireGuard Server Connection
If you need to check your WireGuard server's connection, you can use the following:
sudo wg show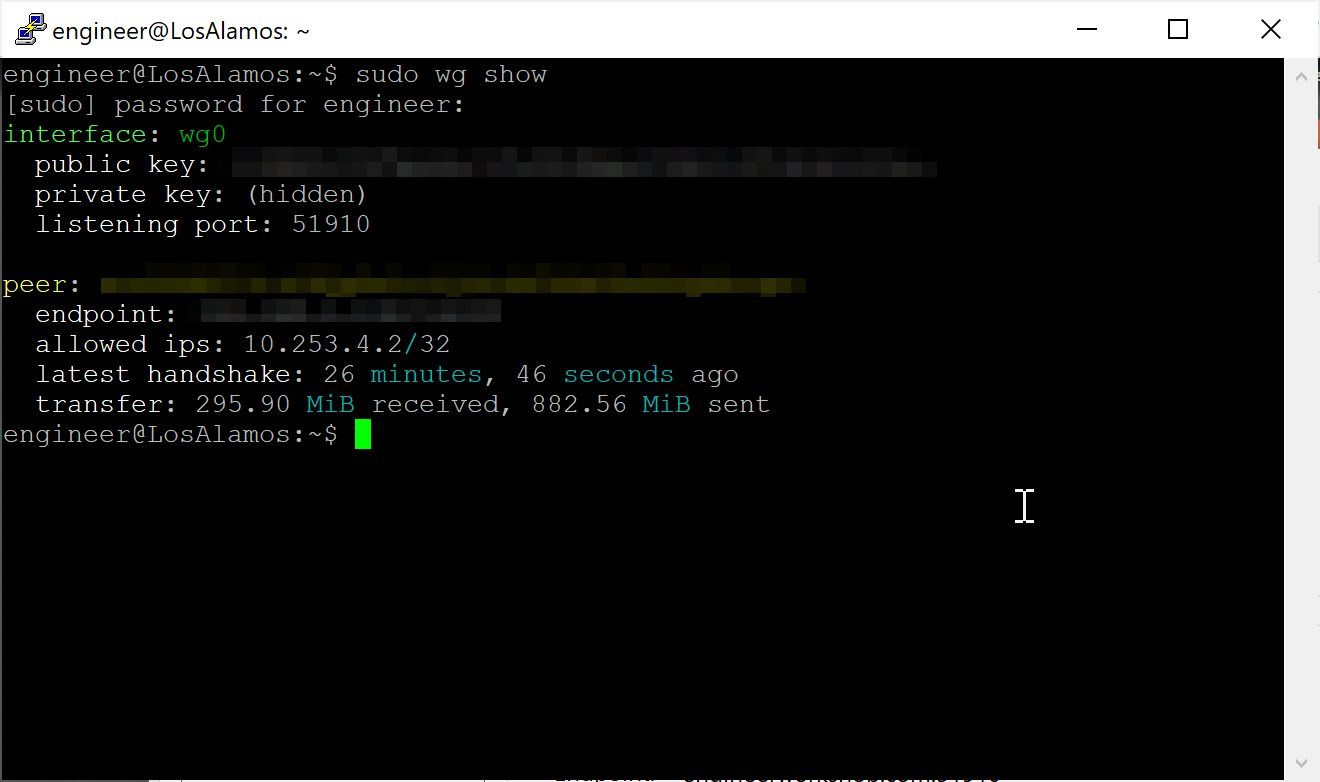
If you don't see the above output, double check your server configuration and also make sure you've set up WireGuard to start automatically. sudo wg show also shows you not only the wg0 interface on the tunnel, it also shows peer connections so you can see what clients are connected to your WireGuard server.
Additionally, using ifconfig should show your wg0 interface:
sudo ifconfig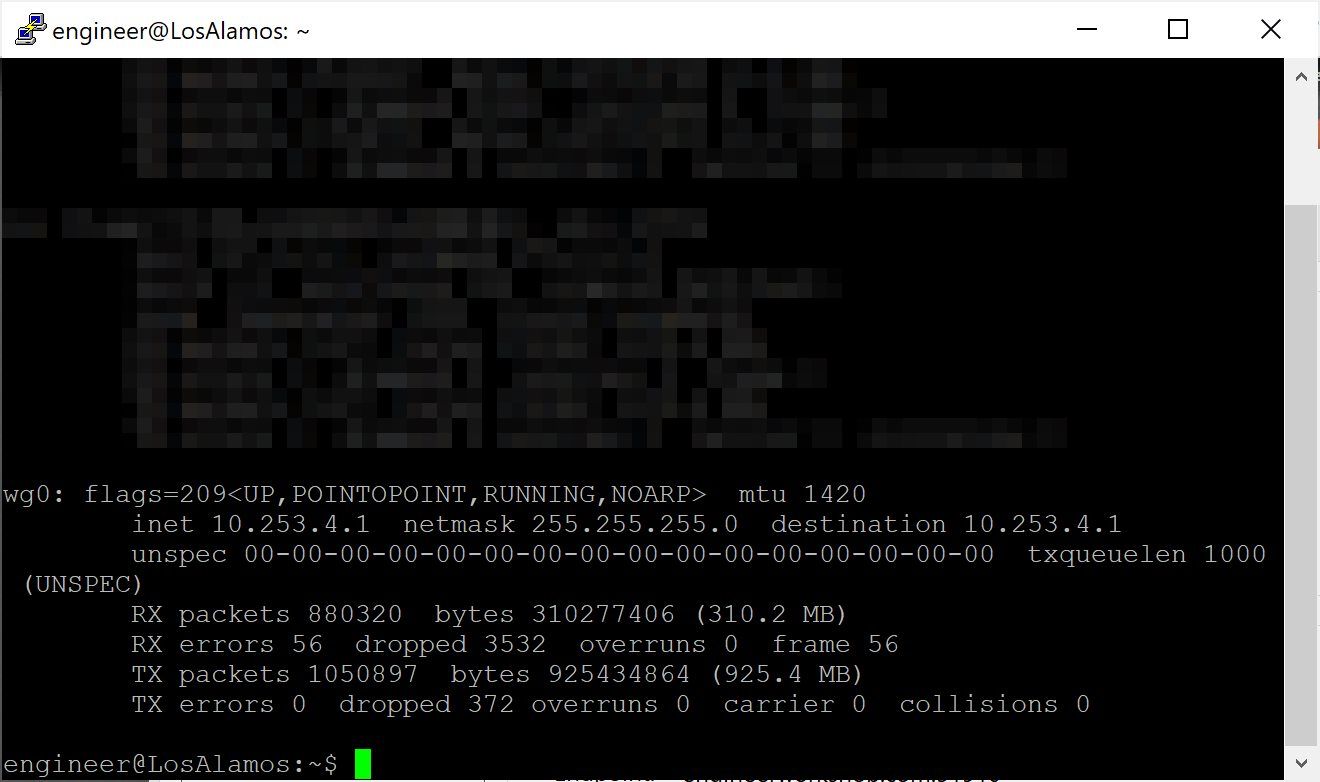
That's it! Congratulations, you now have successfully set up a WireGuard VPN server on Ubuntu. As always, let me know if you have any questions and I look forward to hearing from you in the comments below!